If you are looking for a fun and creative way to tell a story, or as an ice-breaker, try using Story Dice.
When the website launches you will see something that looks like the screenshot below. You will also have the option to choose 9 dice.
Please note if you are an elementary school teacher there are two icons that come up. One is of what appears to be a beer and the other is underwear. Just an FYI.
If you would like to create a countdown timer (or a count-up, clock, ticker, stopwatch, or timer) with the ability to change the background image, color, etc, give tickcounter a look.
You can share the timer in a link as well as embed it into a website (like the one you see below for New Year's).Countdown
Embedded below is a timer 2 minute and 11 second YouTube tutorial taking you through the steps.
If you would like to quickly and easily create a collage of up to 6 photos, try Google Photos app. Once you select the images you will see a collage created. If you tap on an individual photo you will then see the edit and replace options where you can enhance, crop, as well as adjust brightness and add filters. It is also nice to know that if do tap on an individual photo in the collage you can move the image up and down as well as left and right.
One last item to point out is that you have options available to you at the bottom of the screen. These options allow you to add some artistic options.
It is important to note that if you would like up to 9 images in your collage use the web version of Google Photos.
Embedded below is a 1 minute and 44 second YouTube tutorial.
If you would like a simple way to create and share a map of visited states in the United States, or countries of the World give https://www.amcharts.com/visited_states/ a try.
It is very simple as you can either select the state on the map or scroll down and choose the states (they are in alphabetical order).
You can then download the map (look in the upper right for the download option), as well as share through social media, post in your website, or simply share the URL.
Embedded below is a 1 minute and 30 second video plus an image of the states I have visited.
If you (or your students) would like to add a character to your voice, give Adobe Express a look (click here for a direct link).
When you enter into the site, you can start creating your animation right away; however, I would recommend creating a free account so you can download the creation.
When you do start creating the animation you will see the page that you see below. You can start to record right away; however, you also have the options to the right to change your character, background, as well as size.
Once you have made your selections, you will then be able to record your voice (or upload an audio file) up to 2 minutes in length. You can then see the created animation and then have the option to trim some of the video from the beginning or end of the creation.
You can then download the creation and share it where you would like.
Embedded below is a 2 minute and 9 second YouTube tutorial.
As with all of Eric's posts, he includes a video tutorial as well as step-by-step directions.
Make sure you click on the Google Slides template Google Slides link you will then need to make a copy of the entire slideshow.
If using Google Classroom be sure to make it an assignment and force a copy to each student.
You will then see the presentation with directions available on the first few slides.
The turkey is on slide #7.
On slide #8 you will see the feathers.
Make sure to remind your students to copy the feather (ctrl c) and then paste (ctrl v) onto slide #7.
The students can then edit the text and state what they are thankful for.
They will then need to move the feather to the appropriate area as well as tilt the feather as well (look for the blue circle that allows you to tilt). You may need to remind them how to do this, especially with younger users.
They will then need to send the feather to the back.
To do this they can either right-click or select the feather and tap on their touchpad and select order send to back.
When completed, students can download to their computer (download as a PNG image) - or if they turned in the project you can choose to download the Turkey as a PNG image by going to File - Download - PNG image.
Embedded below is an example of a Thankful Turkey as well as a 1 minute and 43 second YouTube tutorial.
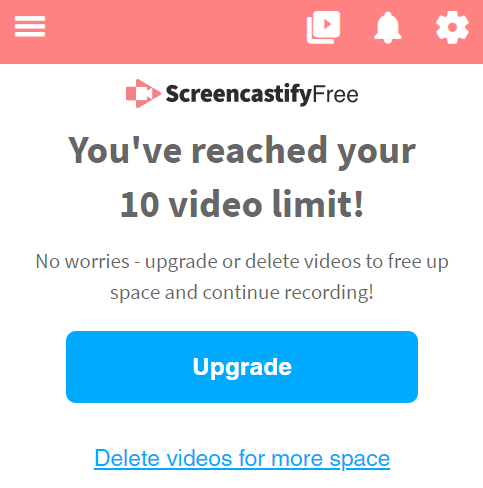
With Screencastify's new plan, many people have reached out asking for alternatives.
Please note Screencastify does allow 10 videos for free that are still stored in your Google Drive. However, if you delete in Screencastify, it deletes the same video in your Google Drive account.
You can go in to your Drive account and make a copy of videos you want to keep and then delete in Screencastify.
While there are many alternatives to Screencastify, the most robust one is Loom. The free version of Loom allows up to 25 videos and 5 minutes in length. However, Loom for Education allows unlimited videos and up to 40 minutes in length. To sign up for an education account - click here.
To get started with Loom, make sure to logon to the site and create your account. Choose your signup method (I used Google) and then (if you use Chrome) add their easy to use extension by clicking here.
Again, if you are an educator, make sure to fill out the Google Form and within 2 days you will be upgraded to an education account (I had a friend who filled out the form and within 2 hours was upgraded).
In the next post I will share how to record with Loom and a few tips and tricks.
Embedded below is a 1 minute and 56 second YouTube tutorial followed by a 2 minute and 8 second tutorial showing how to make your first recording.
If you are looking for a fun poster in your room or a fun graphic in your presentation, take a look at Custom Eye Chart Maker. Make sure to fill in the details and click Make Chart!
There are numerous other charts as well, including the following:
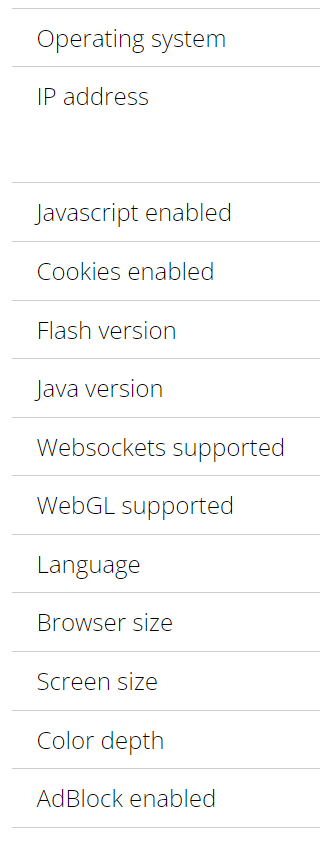
If you have ever been asked what your browser is, or operating system, etc. (or maybe you need to ask someone to do this for you) - try out whatsmybrowser.org.
You will instantly see the browser as well as the options you see below. Please be careful to not share your IP address with just anyone.
You can copy the information as well and share with whomever you need to. It will not share your IP address.
In order to get started make sure you have Classrooms enabled by clicking on the three dots in the upper right of the home screen, choose account settings, and make sure to place a check next to Education Account.
You will now see Classrooms and make sure to select Create Classroom
Create your classroom by choosing Google Classroom, Microsoft, or Clever. Also, check the features you would like enabled and then choose create.
Students now have an account and can log on to Wakelet.com and choose Log in. In the example in the video I used Google.
Students can now create their own Collections, Bookmarks, and join Group Collections. (as you see below).
If a student does start their own collection and then wants to work with another student (or students) - you as the teacher need to go into the Classrooms page on Wakelet, choose the student's name in the class and then share the collection and choose to invite collaborators. Seer image below.
A reminder that collections created by students CAN NOT be shared publicly.
This can be a touch frustrating - especially if you want families to see their child's work. However, there is a solution.
The solution to being able to share work created by students would be to log on to your Wakelet account and create a collection. Example - Sydney's 2022 Portfolio.
You will then need to select share and choose how you would like to share the collection with the student (you can see the options below). Personally, I really like to send by code or send the link directly to the student in Google Classroom.
Now, the student can create their portfolio and you have the options to share the collection with others.
Embedded below are two videos.
The first one (2:12) takes you through the steps from a teacher's point-of-view on how to get started with Classrooms in Wakelet.
The second one (2:18) takes you through the steps from a student's point-of-view on how to create a collection, bookmarks, and how you as the teacher can share a collection with another student to work in a group collection.
Wakelet's Classroom feature is an outstanding way for educators to share content with students in their class.
This is also an amazing and simple way for students to create a portfolio of their work. We will take a look at that in a future post.
In the tutorial you will see below I will take you through the following steps:
How to get a Classroom started (if you do not see the Classroom icon make sure to select settings and toggle on your Educator account).
Select Create Classroom (bottom left )
Choose either Google Classroom, Microsoft, or Clever
Go through the sign-in process and then add the specific class
Toggle on features you would like your students to have
Create the class
You can now create a collection.
This is great for students to have anything you can think of - review links, study guides. helpful sites, etc.
This collection will be instantly shared with all members in your class.
Please note the default sharing settings do not allow students to add anything to the collection, download as a PDF, etc. You can alter those settings as well if need be.
Embedded below is a 2 minute and 12 second YouTube tutorial.
If you wan to keep track of the number of words in a Google Doc you are typing, or you want to see the number in a Doc a student shared with you, simply do the following:
Ctrl_Shift+C
or
Tools > See Word Count > Toggle on Display Word Count While Typing
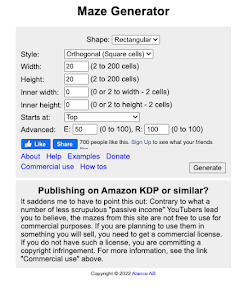
If you are looking for a simple site to create a maze - look no further than Mazegenerator.net
When you enter into the site you will see the options you see below. Of course you can adjust the options as you see fit. You can even change the shape of the maze as well as see a solution to the maze itself.
Embedded below is a 1 minute and 3 second YouTube tutorial.
If you have been on Twitter and you noticed that the latest tweets appear to be from hours ago, make sure to select what appears to be 2 plusses and a star and then change from Top Tweets to Latest Tweets.
I have had a few teachers asking me recently about the difference between using the @ symbol in a Doc and the comment feature and what that looks like.
Doc in body of Doc
If typing in a Doc and use the @ symbol - type in someone's name and they will then be alerted and you can share the doc with them without having to go into the Share icon.
Comment Section
In the comment section you type in the @ symbol and then their email address you will see a note stating that the person you included has been added to the discussion and an email has been sent. The sharing settings will then come up for you as well.
Embedded below is a 1 minute and 51 second YouTube tutorial.
Little Alchemy allows you to mix items and create the world basically from scratch. You will start with four items on the right (air, earth, fire, and water). You drag one of the items into the middle of the screen and then drag another on top of it. This will then create another item - example - water and water creates a puddle. The newly created item you can see on the right hand side as well as stored in the Encyclopedia (hint there are 720 items to create).
If you ever get stuck, or just want to see what is created you can always use YouTube to see all the creations with a full walkthrough of all 720 items.
Embedded below is a 1 minute and 55 second YouTube tutorial I created.
A great feature in Google Docs is the ability to voice type using control shift s. Students really enjoy this feature; however, when you are not on a Google Doc - they can be a bit bummed that it does not work.
What you can do (if you are on a Chromebook) is to go into the accessibility features and select dictation. This will have a microphone appear in the bottom righthand corner of your Chromebook. Make sure to select it and then speak. When finished speaking/typing, make sure to click on it again. While a simple tool, I am sure for many, this will be very helpful.
Embedded below is a 1 minute and 49 second YouTube tutorial.
If you create a video and mark it as private, you can still share the video with others while still keeping it private.
When you publish your YouTube video you will see the options for Private, Unlisted, and Public. What is nice is, under Private you will see a link to Share Privately.
You will then see the ability to email others to see the video. Please note that the users must have a Google account to view the video.
If you (or a student) would like to have selected text read aloud, simply use the Select to speak option. This option is available in the accessibility section on a Chromebook (select the area near the clock, choose accessibility and then Select to speak).
When you have a section you would like to be read aloud, make sure to choose the option, and then a text box will appear that you can drag to include the text you would like included.
Embedded below is a 2 minute and 16 second YouTube tutorial that includes the above as well as a few tips and tricks.
Google recently added the long awaited addition of adding text style in your Google Forms.
To change the font, simply choose the paint palette (Customize Theme) in the upper right and you will see the options you see below. You will see there are three sections: Header, Question, and Text. You can then adjust the text style and text size to fit your needs.
Embedded below is a 1 minute and 9 second YouTube tutorial.
If you would like to be able to create a reading list of pages on the web quickly and see all bookmarks in Google Chrome simply select the icon to the right of the extension icon to the right of the address bar (see image below). The extension icon looks like a puzzle piece and the side panel icon looks like a white rectangle and grey rectangle.
When you select the side panel icon you will see the ability to add the current tab you are reading to your reading list as well as the ability to see all your bookmarks quickly and easily.
Embedded below is a 1 minute and 27 second YouTube tutorial.
Recently Google started to release the "upgrade" on the ability to add emojis directly into Google Docs. Previously users had to go to Insert> Emojis and then proceed from there.
With the new update, users can use the @ symbol and type in the emoji of choice. For example when you type in @dogs, make sure to scroll down a bit as the popup menu will show you people first, and then places, etc. However, it is a short scroll and you can see many of the emojis to select from.
A fun and engaging way for students to show what they know about events from the past or simply a conversation between 2 characters is to create a text conversation using a site like Fakewhatsappgenerator.
When users enter into the site they will see the ability to select the phone settings, battery options, connection, and most importantly - the messages (see image below).
In the 2 minute and 17 second YouTube tutorial below I take you through the steps necessary to get a full conversation as well as one way to make it look like it was on a phone.
If you ever were curious exactly where a raindrop ends up, check out River Runner (also a World version is available in Beta).
Type in a place you would like to see where the raindrop ends up at the end of its journey. A video is created and you see a tour of the path of the raindrop.
Embedded below is a 1 minute and 20 second YouTube tutorial.
If you work with a number of Chromebooks, or you would like to quickly and easily know the Asset Tag and Serial Number without logging on, use Alt +V on the sign-in screen.
Google recently added the ability to create pageless documents. This is nice because you can create a document as long as you like without having to worry about paragraphs or sentences jumping to the next page and breaking the formatting. They will flow just like a website does, a forever scroll. This is nice for your students/families or others as they can just scroll through the information. Check out how to change any Document into a Pageless Document with just a couple of clicks.
Open a Google Document.
Click on “File” and then “Page Setup”.
Select the “Pageless” tab at the top.
If you want to set the page background color you can do that as well.
Click “Ok” at the bottom to set this change.
This can all be undone and set back to regular pages by going back into Page Setup, choosing the “Pages” tab, and clicking “Ok”.
Embedded below is a 1 minute and 47 second YouTube tutorial.
Utilizing multiple Google Chrome accounts can be very beneficial as it keeps personal accounts and work accounts separate.
If you want to quickly see how to create multiple accounts, please click on the 1 minute video embedded below.
Below that you will see a 1 minute and 31 second video showing you the benefits of pinning those accounts and how to quickly launch a specific site right away.
Click below for how to pin those accounts and what right-clicking does for you.
If you would like to remove the background of a photo, make sure to update your device to iOS 16. You can then touch and hold the subject of interest in the photo and then you will see a highlight going around the subject. Then make sure to copy or share.
One more thing, when you send a text message too fast and you want to edit it - touch and hold the message and choose to edit. It will then let you know it was edited and the receiver knows that the message was edited.
Fontmeme has a simple and easy to use text generator with lots of options. Simply enter into the site and choose your font and then scroll down to enter in your text as well as adjust the size of the text as well as any kind of effect and color. Make sure to then generate the text in the font your choose.
You can then select the pencil to see all the options you would like.
I did not adjust anything and right-clicked on the image and copied it into a Google Doc.
See the images below as well as a 1 minute and 25 second YouTube tutorial.
MapPuzzle is a fun online interactive map game where you drag and drop countries or states onto a world map.
You can see in the image below the options to try World Borders, Spanish Provinces, USA States, etc. You can also reset the game as well. Make sure when you select the country/province/state - you click on it and then drag to the appropriate spot on the map and click on it.
Embedded below is a 1 minute and 4 second YouTube tutorial.
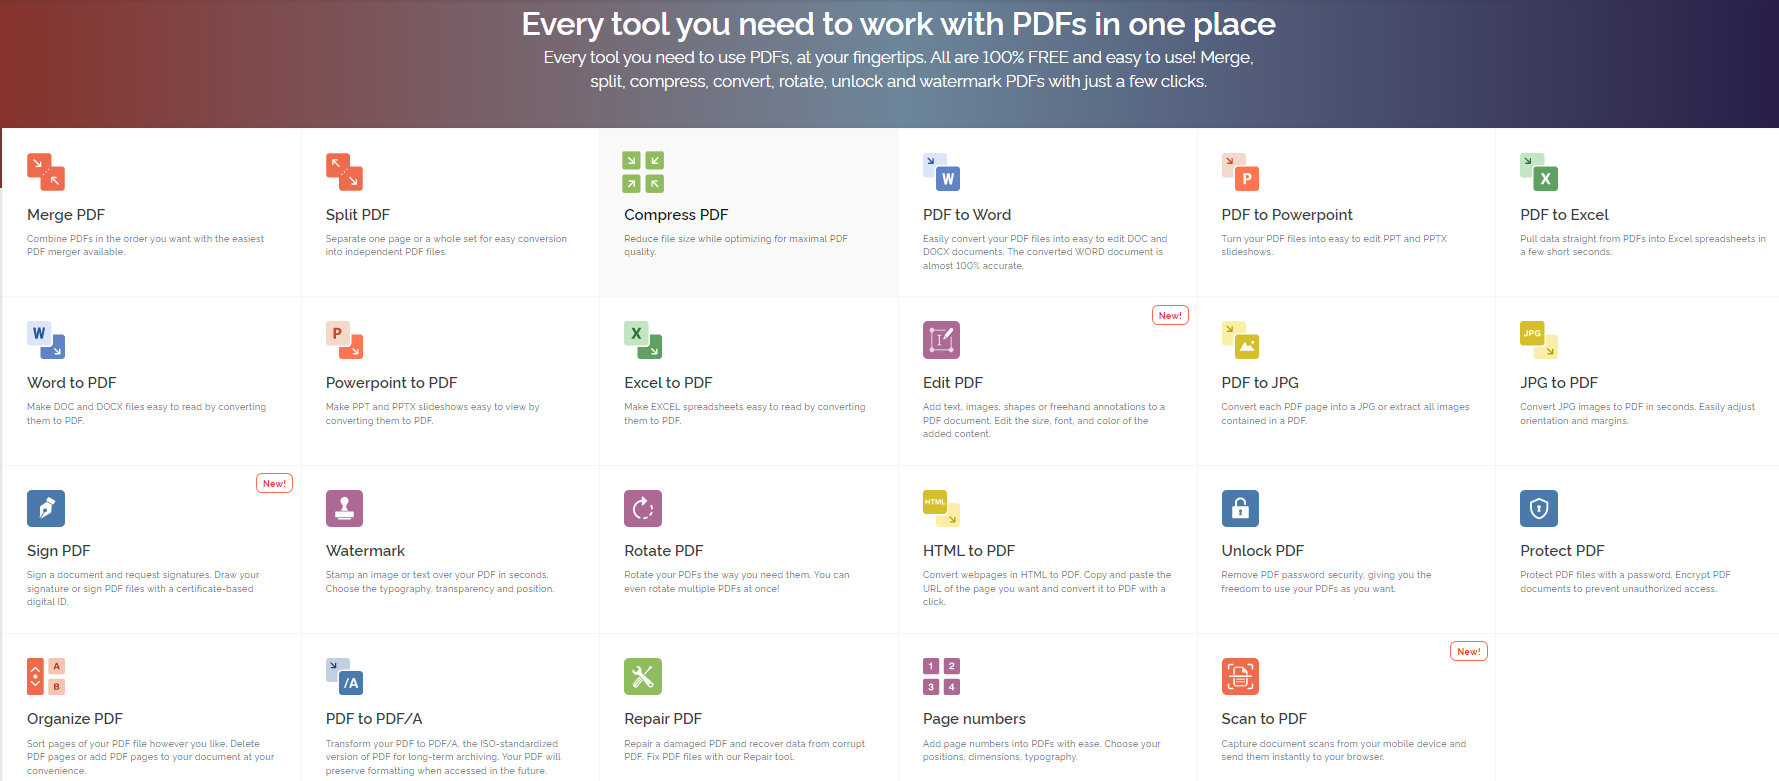
One of the most common questions I am asked revolves around PDFs and how to edit them. While nothing is perfect, Ilovepdf allows you the options you see below.
Embedded below is a 2 minute and 16 second YouTube tutorial showing how to edit as well as convert your PDF to a Word Document.
If you would like the font size larger on your Windows 10 device there are two ways to do it. You will be going to the Accessibility settings on your computer.
Press the Windows logo key+U or select Start > Settings > Accessibility.
Select Text size. Drag the Text size slider to the right to increase the size of the sample text.
Once you are happy with the size of the text make sure to select Apply.
If you would like to see a tutorial of the ins and outs of Classroomscreen, take a look at the video below. It will show you the different widgets and the new features.
A great feature built into Classroomscreen is the ability to embed a YouTube video directly onto the screen. This could be useful for relaxed music when students enter the day, or for whatever you need.
To access this feature make sure to select more widgets and then video.
Embedded below is a 1 minute and 14 second YouTube tutorial.
If you have used Clssroomscreen in the past you will remember that they had a polling feature, but the remote polling was only if you paid for an upgrade. With the new version of Classroomscreen, you can now use this feature for free (just need to create a free account).
When you choose the polling feature you will see the options for multiple choice, smileys, as well as True/False. When you choose your poll type you will see options to remove and or add options, choose the poll settings, how to vote, as well as the chart type.
If you create an account and sign in, the option of remote polling is available. At the top of the poll you will see how to vote and the specific code users will use. You will also see the option to display a QR code that users can utilize.
The remote voting is great as you have the option to display the voting live, hide the votes, as well as lock the voting.
Embedded below is a 1 minute and 52 second YouTube tutorial.
Slides Timer is an extension which will automatically bring timers to life in presented slides. Times placed between << and >> will be replaced with a timer. Use - as the last character to count down from the specified time. Use + to count up from the specified time. use <<time>> to display the current time.
Example:
<<5:00->> will count down starting at 5 minutes.
<<2:00+>> will count up starting at 2 minutes
<<time>> will display the current time
<<time^>> will display the current time without seconds
<<time&>> will display the current time without am/pm
<<time^&>> will display the current time without seconds and am/pm
<<date>> will display numeric dates in / format
<<shortdate>> will display abbreviated word date values
<<longdate>> will display full word date values
<<00:30-->> will advance to the previous slide on countdown
<<00:30-+>> will advance to the next slide on countdown
<<00:30-@>> will trigger inserted audio on countdown
<<00:30-!>> will trigger inserted video on countdown
<<00:30-~>> will continuously countdown when navigating slides.
<<00:30+~>> will continuously countup when navigating slides.
Lately a number of people have been asking about the Snipping Tool and the announcement that it is moving.
While the snipping tool is simple to use, I would like to suggest trying to other items.
Try adding Snip & Sketch. This is basically a more robust version of the snipping tool.
I strongly encourage you to use the shortcut Window Key + Shift + s.
This will allow you to take a screenshot and will save it to your clipboard.
Please know that you can use Ctrl v to paste the screenshot or..... take a bunch of screenshots and come back to the clipboard by pressing Windows Key v.
This will take you to all of your screenshots.
Embedded below is a 2 minute and 23 second YouTube tutorial.
The ability for users to see captions in a video in YouTube can be accessed by either selecting the letter c or by clicking on the closed-captioning. While not all videos have closed-captioning available, many do.
You could also have those captions be translated for students or whomever you would like. To access the translation make sure to have the closed-captioning on and then the settings gear, choose CC subtitles, then auto-translate, and then choose the language you would like.
Embedded below is a 1 minute and 16 second YouTube tutorial.
In YouTube the ability to create and share Playlists with students and families allows for some great learning resources to made available to them.
One "issue" is when you are playing a video and that video is categorized as "Made for Kids" it does not allow you to add them directly to a playlist. A way to still add that video it to search for the title of the playlist in YouTube, but do not play it. Look for the thumbnail video and choose the three dots in the upper right. You can now save that video directly to a playlist of your choosing. (see image below)
Embedded below is a 2 minute and 9 second YouTube tutorial showing you how to create a playlist, how to delete a playlist, as well as how to share a playlist.
Khan Academy is an amazing free resource available for our students (and for us as well). While it can be overwhelming, a simple way to use it would be to send review questions to your students. What is great about it is that the students can take the assessment (usually between 4-7 questions), receive assistance if needed, and then see their score. What I especially like is the fact that they can click on the score and see their answers to the questions as well as retake the assessment and get a higher grade!
Embedded below is a 1 minute and 37 second YouTube tutorial showing you the necessary steps.
If you like to play Wordle - there is a great website called mywordle.me that allows you to easily create your own Wordles to share with others. I created a blog post as well - How to create your own custom Wordle.
Flippity.net has included the game called Word Master. ** Make sure to check out all of Flippity's other options as well - it is an outstanding site.**
Word Master is very similar to Wordle with a few minor tweaks. You can see the differences below:
Important differences from Wordle:
There is no dictionary. Players may type whatever the wish, including gibberish.
There is no standard character set. You may use numbers, symbols, and non-English characters in your puzzles (but players will need to be able to type those characters.)
You may use words of any length up to 10 characters. 5 character words are recommended.
Embedded below is a 1 minute and 59 second YouTube tutorial.
If you have ever had a website not load properly there is a shortcut that allows you to reload the webpage without using cached content - try Shift+Ctrl+r.
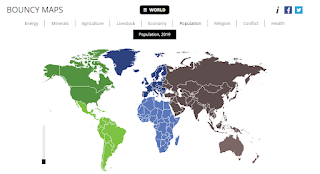
Bouncymaps provides users with a look at data on a map in a whole new way. The site shows the "regular" world map with the ability to hover over each county and show data revolving around the criteria (example - United States has 329.1 million people which is 4.3% of the World's population). However, where it gets super "cool" is when you look at the bottom of the map and choose Bouncy Map instead of World Map. The map "changes" to reflect the criteria, not the land size of the country.
There are a number of criteria that includes sub categories as well.
Embedded below is a 1 minute and 31 second YouTube tutorial.
If you are in need of converting a media file into another file, give online-convert.com a try. The site is very easy to use and can convert the files you see below.
Embedded below is a 1 minute and 48 second YouTube tutorial showing the steps involved.
Google Photos has a ton of amazing feature; however the one that can save you a ton of time is the search option. You can search by face (include a name for even easier searching), favorites, holidays, concerts, sports, and my favorite one for specific search is by date. Just type in a date and Google will take you right there. Nice to have that ability.
If you have ever copied an item on your Windows-based device and then by mistake copied another one prior to pasting the original one, you know it can be a big frustration. Well, there is a simple solution:
hold down the Windows Key and the letter V
You will then see the previously copied items on your clipboard.
Embedded below is a 1 minute and 14 second YouTube tutorial.
On a Chromebook if you have copied a website link or an image and then went ahead an copied another link or image before pasting the last one it can be frustrating. Thankfully all you need to do to find that last copied link or image is to
select the "search" button (look like a magnifying glass above Shift) and the letter V
You will then see the last 5 items you copied.
Embedded below is a 1 minute and 14 second YouTube video.
If you have a website that you have found but would like to save it for later, try adding the extension Tab Snooze.
Once you click on the extension you can snooze the tab to come back to at a later date and time. Now, I have reached out to the developer to see why the at the date of this post some of the options are not showing as you see below.
Embedded below is a 1 minute and 54 second YouTube tutorial.


.png)