Tuesday, October 25, 2022

Free screen recorder with unlimited videos and up to 40 minutes in length - LOOM

 With Screencastify's new plan, many people have reached out asking for alternatives. 

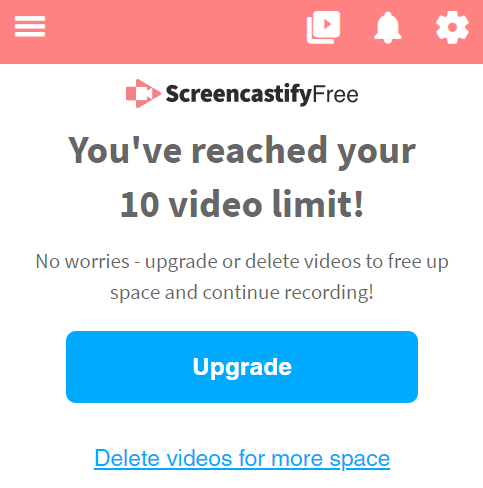
  • Please note Screencastify does allow 10 videos for free that are still stored in your Google Drive. However, if you delete in Screencastify, it deletes the same video in your Google Drive account. 
    • You can go in to your Drive account and make a copy of videos you want to keep and then delete in Screencastify.
While there are many alternatives to Screencastify, the most robust one is Loom. The free version of Loom allows up to 25 videos and 5 minutes in length. However, Loom for Education allows unlimited videos and up to 40 minutes in length. To sign up for an education account - click here.

To get started with Loom, make sure to logon to the site and create your account. Choose your signup method (I used Google) and then (if you use Chrome) add their easy to use extension by clicking here.
 
Again, if you are an educator, make sure to fill out the Google Form and within 2 days you will be upgraded to an education account  (I had a friend who filled out the form and within 2 hours was upgraded).

In the next post I will share how to record with Loom and a few tips and tricks.

Embedded below is a 1 minute and 56 second YouTube tutorial followed by a 2 minute and 8 second tutorial showing how to make your first recording.


Take care,
Brad

Friday, October 7, 2022

Need practice writing (print or cursive) with pre-made and customizable sheets - try Handwritingpractice.net

 If you are in need of practice writing (print or cursive) with pre-made and customizable sheets, check out handwritingpractice.net.

You will see the options at the top of the screen for handwriting, print, cursive, D'Nealian, and custom practice writing.

Embedded below is a 57 second YouTube tutorial.


Take care,

Brad

Thursday, October 6, 2022

TinyWow.com - Free website with a huge selection of tools for working with PDFs, videos, images, etc

 If you have ever needed to convert and image, video, or file take a look into Tinywow.com. It is a free website that is very user friendly.

At the top of the page you will see the different items you can convert that then shows all of the different file types you can convert your file to.

I used this with a fellow teacher recently when she needed her pictures she took converted from her iPhone (HEIC) to a JPG.

Embedded below is a 1 minute and 21 second YouTube tutorial.


Take care,

Brad


Create fun custom charts! Eye chart, road sign, medal maker, etc.

 If you are looking for a fun poster in your room or a fun graphic in your presentation, take a look at Custom Eye Chart Maker. Make sure to fill in the details and click Make Chart! 

There are numerous other charts as well, including the following:

Embedded below is a 55 second YouTube short.

Take care,
Brad

"What browser am I using?" "What's my operating system?" Try whatsmybrowser.org

 If you have ever been asked what your browser is, or operating system, etc. (or maybe you need to ask someone to do this for you) - try out whatsmybrowser.org.

You will instantly see the browser as well as the options you see below. Please be careful to not share your IP address with just anyone. 

You can copy the information as well and share with whomever you need to. It will not share your IP address.


Embedded below is a 43 second YouTube tutorial.


Take care,

Brad

Wednesday, October 5, 2022

Classrooms in Wakelet from a Teacher and Student Point-of-View.

  Wakelet is an amazing platform that allows users to save, organize and share content from across the web with a single link and all for free.


A new amazing feature built into the platform is Classrooms. Classrooms allows you to work with students in a safe and secure way. To see Wakelet's blog post on this topic - please click here. You can also see James and Amy's video tutorial.


  • In order to get started make sure you have Classrooms enabled by clicking on the three dots in the upper right of the home screen, choose account settings, and make sure to place a check next to Education Account.
  • You will now see Classrooms and make sure to select Create Classroom 
  • Create your classroom by choosing Google Classroom, Microsoft, or Clever. Also, check the features you would like enabled and then choose create.

  • Students now have an account and can log on to Wakelet.com and choose Log in. In the example in the video I used Google.
  • Students can now create their own Collections, Bookmarks, and join Group Collections. (as you see below).
  • If a student does start their own collection and then wants to work with another student (or students) - you as the teacher need to go into the Classrooms page on Wakelet, choose the student's name in the class and then share the collection and choose to invite collaborators. Seer image below.

    • A reminder that collections created by students CAN NOT be shared publicly.
    • This can be a touch frustrating - especially if you want  families to see their child's work. However, there is a solution.
  • The solution to being able to share work created by students would be to log on to your Wakelet account and create a collection. Example - Sydney's 2022 Portfolio.
  • You will then need to select share and choose how you would like to share the collection with the student (you can see the options below). Personally, I really like to send by code or send the link directly to the student in Google Classroom. 

  • Now, the student can create their portfolio and you have the options to share the collection with others.
Embedded below are two videos. 
  • The first one (2:12) takes you through the steps from a teacher's point-of-view on how to get started with Classrooms in Wakelet. 
  • The second one (2:18) takes you through the steps from a student's point-of-view on how to create a collection, bookmarks, and how you as the teacher can share a collection with another student to work in a group collection.
Video #1

Video #2


Take care,
Brad

Monday, October 3, 2022

How to get started with Classrooms in Wakelet from a teacher point-of-view

 Wakelet's Classroom feature is an outstanding way for educators to share content with students in their class.

This is also an amazing and simple way for students to create a portfolio of their work. We will take a look at that in a future post.

In the tutorial you will see below I will take you through the following steps:

  • How to get a Classroom started (if you do not see the Classroom icon make sure to select settings and toggle on your Educator account).
  • Select Create Classroom (bottom left )
    • Choose either Google Classroom, Microsoft, or Clever
      • Go through the sign-in process and then add the specific class
    • Toggle on features you would like your students to have
    • Create the class
  • You can now create a collection.
    • This is great for students to have anything you can think of - review links, study guides. helpful sites, etc.
    • This collection will be instantly shared with all members in your class.
      • Please note the default sharing settings do not allow students to add anything to the collection, download as a PDF, etc. You can alter those settings as well if need be.
Embedded below is a 2 minute and 12 second YouTube tutorial.