Today is my birthday and a friend of mine sent me the website https://you.regettingold.com/ . In the site you simply enter in the date in question and you are presented with lots of interesting (and some odd) facts since the day you were born.
Embedded below is a 1 minute and 14 second YouTube tutorial.
If you use Screencastify for recording instructional videos you know how valuable of a tool it is. A nice feature that is relatively new is the ability to add Interactive Questions into your video.
To add the questions you will simply need to access your previously created video and go into your recordings. Make sure to select he interactive questions icon on the right and then you can then start watching your video. When you are ready to ask a multiple choice question make sure to click on the blue "Add Question" icon at the bottom of the page (has a time stamp). Make sure to add at least two possible answers and choose the correct answer. Continue on with as many questions as needed and then share your video with others (top of screen). You can share directly to Google Classroom or as a link.
Once the quiz has been completed you will see responses at the top of the screen as well with the quiz already graded.
If for some reason you need to adjust your questions, make sure you click on list view on the right side of the screen.
Embedded below is a 2 minute and 57 second YouTube tutorial.
If you (or a student) are typing on a Chromebook and the letters you are typing do not come up as they should, take a quick look down to the bottom right of the screen where the clock is. In the United States what you should see is something that looks like what you see below (notice the US).
However, you may see something that looks like this (notice the DV).
The quickest way to "solve" this is to select Ctrl + Spacebar. This should then adjust back to the US keyboard.
If you would like to see more information regarding the keyboard, simply go into the settings, and adjust the different input methods.
In the 1 minute and 3 second video embedded below you will see how to adjust the keyboards.
If you are looking for an easy to use audio editor (and free up to 5 minutes) - check out TwistedWave.
You can upload files as well as create a recording directly within the site. The controls are easy to use and have a few nice features, such as the ability to add an remove markers, change the pitch/speed, fade in/out, etc.
Embedded below is a 2 minute and 6 second YouTube tutorial.
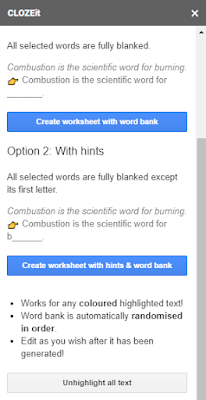
If you would like to have a template set up for your students that includes slides with image placeholders, or you would like to have a Slide with image placeholders, try the following.
Choose how large you would like the placeholder to be
If you would like to copy, make sure to use Ctrl D to make an exact copy
If you would like to add another slide with an image placeholder, go to another Slide and create as you would like.
Rename the edited Slide deck (if you want) and close out of the editing by clicking on the x in the upper right to close the editing feature.
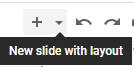
To access your newly created Slides with image placeholder make sure to go above the slide (on the left side) and choose the carrot next to the + (see image below)
Choose the Slides you would like to include (with the placeholders)
If you now want to share the template with your students make sure to name your presentation and then share with your class in Classroom (remember to force a copy).
Embedded below is a 2 minute and 14 second YouTube tutorial.
A great feature in Google Slides is the ability to include all types of content (including video and audio) to go along with text.
A few quick reminders when importing background audio.
If you are using a video as well (you can use the audio as background music) make sure to add the video first, look to the right for options to play on click, play automatically, or play manual.
It is up to you - but if you are using background music I would say to play automatically.
With the audio, there are a number of sites that have royalty free music.
Another one to use is YouTube's - located in your YouTube Creator Studio - Audio Library - make sure to scroll. It is located on the bottom of Dashboard, Content, Playlists, etc.
Once you download your audio, make sure to upload it into Google Drive go back to your Slide and choose to insert audio.
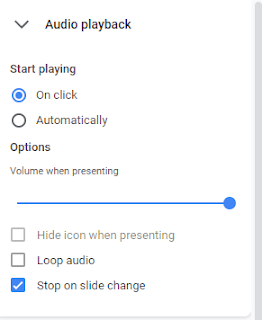
Once you insert your audio you will have a bunch of options that you see below. Again, if your video is automatically playing, I would recommend choosing to start playing automatically.
I would also recommend moving the volume down a bit so it does not overwhelm your audience with too much audio.
You can also Hide the audio icon when presenting, loop the audio, as well as the ability to stop the audio on slide change.
Embedded below is a 1 minute and 53 second YouTube tutorial.
In Twitter you do have the option to Bookmark Tweets to look back later on. While sites such as Wakelet offer a great way to stay organized, a Google extension known as Dewey offers a simple way to keep your Bookmarks organized. You can even organize them by Tags you create.
Embedded below is a 2 minute and 4 second YouTube tutorial.
If you (or your students) like to utilize multiple desktops on a Chromebook, you know how useful they can be to keep "things" organized.
If you do not use desktops, it is a great way to keep organized by storing all of one topic in each desktop (and naming them is nice as well).
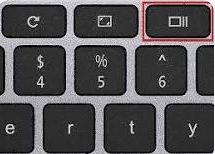
The traditional way to access the desktops is to select the Show windows key (see image below).
If you would like to quickly access the desktops - you could also swipe up on your touchpad with three fingers.
EXTRA TIP!!!!!
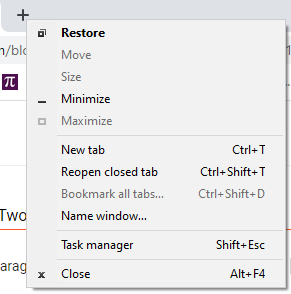
If you close out one of your desktops you will see it side-by-side with one of your other desktops. Of course you could close the desktop out, or you could take the desktop and drag it to the side - as well as your other desktop and you could split screen them!
Embedded below is a 1 minute and 30 second YouTube tutorial followed by a 42 second YouTube tutorial showing how to have a split screen on your Chromebook.
If you use extensions in Google Chrome you know how beneficial they can be. If you are also a fan of shortcuts - you know how helpful they can be. Now, put your hands together.
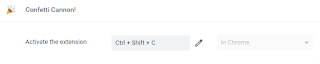
In order to launch an extension with a shortcut simply click on the extension icon and choose manage extensions.
Once you have opened the Manage Extensions, choose the 3 lines in the upper left and select Keyboard Shortcuts.
Then, click on the pencil to the right of activate extension, and then choose something like Ctrl + Shift + C. Then, try out your new shortcut. Make sure to not use something such as Ctrl + C (because that it a shortcut that is used a lot).
Embedded below is a 1 minute and 12 second YouTube tutorial.
If you would like to take a full page screen capture try the extension Go Full Page. The extension does exactly as is stated and takes an entire full page screen capture. You can download as a PDF or PNG. To make edits to the full page screen capture there is a 7 day free trial followed by a $1/month fee.
Embedded below is a 2 minute and 8 second YouTube tutorial that also includes how to tale a screenshot by using the following:
If you would like to quickly split your Windows based device into multiple screens you could always use an extension like Tab Resize; however the much easier way is to simply use a shortcut.
If you have ever had a website not load properly, try clearing your cache. Think of cache as the place where your browser (in this example Google Chrome) stores images, code, and other file types to avoid having to redownload repeatedly. Your browser would run a lot slower if cache did not exist. That being said, sometimes those stored images/code/other files can have something go wrong with them.
So... try clearing it. Here are two ways to do it in Chrome:
select the three dots in the upper right ---select settings--- security and privacy --- clear browsing data --- make sure cached images and files are selected --- clear data
hold down Ctrl Shift Delete --- make sure cached images and files are selected --- clear data
I would then recommend restarting your computer and trying the site again.
Embedded below is a 1 minute and 16 second YouTube tutorial.
If you are using a Windows-based device, one thing to try (if you are not already) is to use multiple desktops. I do mean multiple desktops on your computer, this does not mean to have multiple monitors (although that is ideal).
If you are use three fingers on your touchpad and start from the bottom and swipe up you will then see the possibilities to add more desktops. This is helpful because you could have a different browser available to you. a different lesson all ready to go, etc.
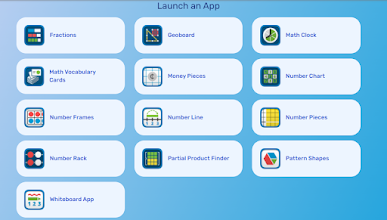
Mathlearningcenter.org is a site that contains numerous free resources to try with your students. There is a web version available as well as apps available to add in Chrome and iOS. The apps/sites are extremely user friendly. What I really like is that you can share the work created directly in the site as a direct link or download an image to share. This is extremely helpful for students that may have missed a lesson or would like to see the work again.
Also, when selecting the app make sure to check out the tutorial as well as select the i to see helpful How To information.
Embedded below is a 2 minute and 15 second YouTube tutorial (I show the math clock app).
With all the amazing Google Forms offers, one "pain point" I have heard many times is the fact that the results can be frustrating to decipher.
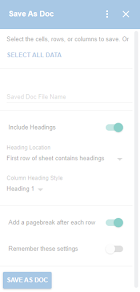
Thankfully a Google Add-on allows the results to be read in a much easier format. The Add-on (in Sheets) is called Save as Doc. This is amazing as you can now see each person's response on their own page(s). This is especially helpful while reading longer responses.
Once you have gone through the process, the Add-on will be available in your Google Sheet on the right-hand side. You will then see the options you see below. Be sure to select the cells you would like to utilize (I choose all data) as well as name your document. As for the Heading - you have 5 options (1 is the largest and 5 is the smallest).
Embedded below is a 2 minute and 6 second YouTube tutorial.
If you would like to receive a motivational quote when you open a new tab in Google Chrome - try adding the Daily Motivation - Motivational Quotes extension.
Once you add the extension, make to allow the extension to open when you open a new tab. Also, look into the gear in the upper left to change the theme.
Embedded below is a 1 minute and 11 second YouTube tutorial.
If you are signing in to your Chromebook and your password has recently changed, make sure to put in your old password when prompted. However, do not worry if you do not remember it. What you can do is simply select Forgot old password.
If you do this just know that all local data that was previously saved on your Chromebook will no longer be available, only synced data and settings will be restored.
If you would like to add some virtual confetti to your lesson try adding the Confetti Cannon! extension. Remember to pin the extension by clicking on the extension icon (looks like a puzzle piece).
Embedded below is a 41 second YouTube tutorial. Thank you to Alison Navarrete for sharing this with me.
If you use Classroomscreen in your classroom to support class activities, you will know that there are built in audio sounds to the timer. While you can not add additional sounds to the timer - you can embed a webpage with additional sounds.
The example I use in the embedded video below is a Teacher Soundboard created by Candace Buchanan. What you can do is select media in Classroomscreen and embed the teacher soundboard's url.
You will then see the site on the screen. You can shrink or enlarge the embedded page as well as navigate between the 3 pages.
Embedded below is a 1 minute and 49 second YouTube tutorial.
If you would like to quickly bring up the sharing settings of a document in Google Drive, simply select the document and press the period key. That's it!
Google recently announced the ability to create (or import) text watermarks in Google Docs. If you are importing a Microsoft Word document, the text watermarks will show.
Originality reports are now available for Google Slides files when used in Google Classroom (previously it was just available in Google Docs). Click here for the announcement from Google.
A few brief reminders about originality reports is that you (as the teacher) can turn on 5 reports per class. Also, students can run 3 reports prior to handing the assignment in. Please click here for more information from Google.
Embedded below is a 2 minute and 2 second YouTube tutorial showing originality reports from a teacher and student point-of-view.