While I have shared many posts in the past, this may be the most important one. A site like you see below has the power to make people think, smile, laugh, and even possibly change the course of someone's life.
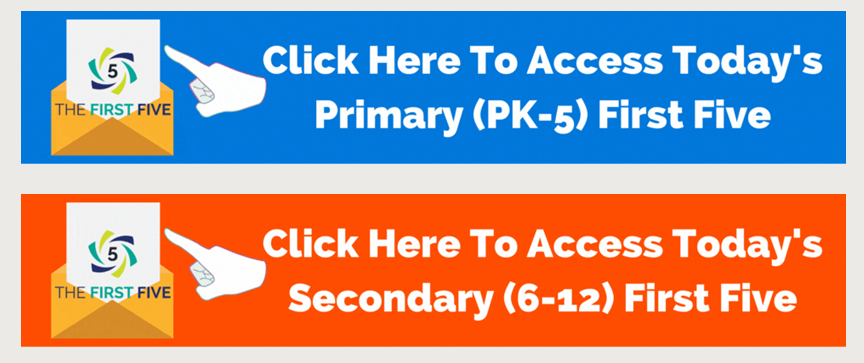
This morning a friend of mine asked me if I ever heard of the first five? I thought he meant daily five, but I asked him to show me. Well, I am so glad he did. Edtomorrow offers The First Five which are inspirational, and free social-emotional learning activities delivered to your inbox by 7:00 am every day (click here for the form). Embedded below are some of the examples they send to you. Click here for the sample as well. They include a meme, questions to facilitate discussions, greetings at the door examples, a quick connect that you could easily extend into a writing prompt, self check-in (using The Rock), Mindfulness, Positivity, Character Quote, and an inspirational video.
When you receive your email in the morning you will see two different options to choose Primary (K-5) or Secondary (6-12).
** For some reason when you sign up, you may see that the operation timed out and to please try again. If you see this, feel free to try again; however, I just signed up through my phone and it sent to my school email.**
Also, if you do not see your email at 7:00 am the next day, make sure to check your Junk mail and then allow the email (if using Outlook simply right click on the email - Junk - Never Block Sender).
I really hope you take the time to sign-up for this site. Remember how powerful it is when someone has motivated you - you are that motivator for those kids out there needing to hear or read what you share!
Embedded below is Edtomorrow's YouTube tutorial followed by mine.
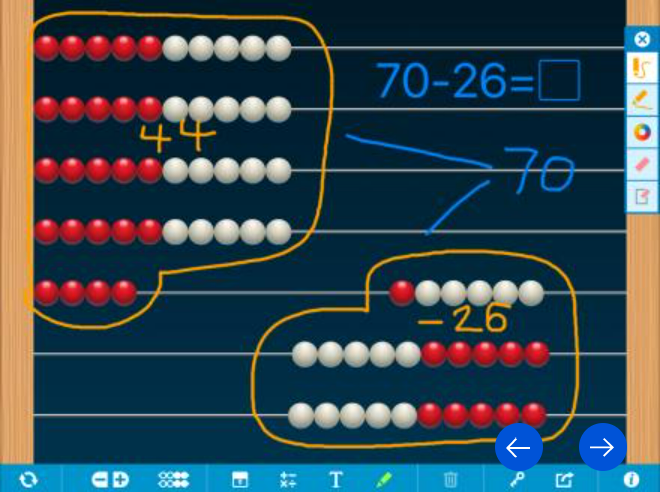
Mathlearningcenter has a nice and simple site to use - Number Rack.
The site starts with two racks having 5 red beads and 5 white beads which allow you to slide them back and forth. This is really helpful as you can show different ways to represent addition and subtraction problems.
You can also had up to 10 total racks (racks 6-10 have the reverse colors of the beads).
Embedded below is a 2 minute and 20 second YouTube tutorial.
The website created by the Mathlearningcenter Number Line allows users to have a number line with settings for whole numbers, fractions, decimals, and no numbers at all (along with a choice for spacing).
As a user you can then select to add "jumps" where you have the ability to spread out the jump to the size you would like. If you grab the right side and take to the left it will "jump" backwards. You also have the possibility to add jump labels and line masking as well as to add a custom tickmark.
Embedded below is a 1 minute and 55 second YouTube tutorial.
Math Vocabulary Cards website by the Math Learning Center is a great resource for students and teachers to improve (or help others to improve) their math vocabulary skills. The Math Vocabulary Cards website is a digital tool designed to help students build math vocabulary by providing clear definitions, illustrations, and examples.
Let's dive in and explore the different features and benefits of this website.
Once you have accessed the website, you will be presented with a list of math topics to choose from. You can select the topic that you are currently studying or want to learn more about. The topics are organized by grade level, so you can easily find the relevant content.
Step 3: Choose a Vocabulary Card
After you have selected a topic, you will be presented with a list of vocabulary cards. Each card has a term, definition, and an illustration or example to help you understand the term better. You can scroll through the list of cards and choose the ones that you want to learn.
Step 4: Use the Vocabulary Cards
Once you have chosen a vocabulary card, you can use it to improve your math vocabulary skills. There are several ways to use the cards, including:
Reading the term, definition, and example out loud to help you remember the term.
Creating flashcards with the vocabulary words and their definitions.
Practicing using the vocabulary words in math problems.
Quizzing your students, yourself, or a friend on the definitions of the terms.
Using the illustrations to help you understand the concept visually.
The Math Vocabulary Cards website is an excellent resource for students and teachers to improve their math vocabulary skills. By following the steps outlined above, you can use the website to learn new terms, understand their definitions, and practice using them in math problems.
Embedded below is a 2 minute and 19 second YouTube tutorial.
The website https://apps.mathlearningcenter.org/money-pieces/ is a great resource for teaching children about money and currency values. It features interactive tools that make learning about money fun and engaging for students. Here's a brief guide on how to use the website effectively:
Understanding the Layout:
When you first open the website, you'll notice that it is divided into two. The left side displays different denominations of coins and bills. The middle section is where you can interact with the different money pieces.
Using the Money Pieces:
The Money Pieces section is where you can drag and drop the different coins and bills to create different amounts. You can use this section to practice counting money, making change, and comparing values of different currencies. For example, you can drag a quarter and a dime to the middle section to create a total value of 35 cents.
In order to exchange money, make sure you circle the coins in question to exchange for larger coins or dollars.
You can also toggle the money grids off and on.
Embedded below is a 2 minute and 17 second YouTube tutorial.
Today I will be sharing a step-by-step guide on how to use the Geoboard site. The G https://apps.mathlearningcenter.org/geoboard/ Geoboard is an online tool that helps students visualize and explore geometry concepts using a virtual geoboard. This site is created by the Math Learning Center and is a great resource for teachers and students alike.
Step 1: Access the Site
To begin, open up your web browser and navigate to the Geoboard site: https://apps.mathlearningcenter.org/geoboard. Once you have accessed the site, you will see a blank grid with dots on it. This is your virtual geoboard.
Step 2: Create Shapes
To create shapes, click on the dots on the grid to create the vertices of your shape. You can also click and drag to create lines connecting the vertices. You can create any shape you want, from simple triangles to complex polygons.
Step 3: Explore Geometry Concepts
Once you have created a shape, you can use it to explore geometry concepts. For example, you can measure the sides and angles of the shape, and calculate its perimeter and area. You can also explore concepts such as symmetry, congruence, and similarity.
Step 4: Customize Your Geoboard
The Geoboard site also allows you to customize your geoboard. You can change the size of the grid, the color of the dots, and the thickness of the lines. You can also toggle the display of the grid and the axes.
Step 5: Save and Share
Finally, you can save your creations and share them with others. To save your geoboard, click on the "Save" button and give your creation a name. To share your geoboard, click on the "Share" button and copy the link to your creation. You can then share the link with your students or colleagues.
The Geoboard site is a powerful tool for exploring geometry concepts. By following these five simple steps, you can create shapes, explore geometry concepts, customize your geoboard, and save and share your creations. I hope you find this guide helpful and that you enjoy using the Geoboard site in your teaching and learning.
Embedded below is a 2 minute and 23 second YouTube tutorial.
Fractions can be a challenging topic for some students, but with the right resources and support, they can become confident in their understanding of this important concept. One of the resources that I have found to be particularly helpful in teaching fractions is the website https://apps.mathlearningcenter.org/fractions/.
This website offers a variety of interactive activities and games that help students visualize and manipulate fractions. One of my favorite features is the "Fraction Bars" tool, which allows students to drag and drop colored bars to represent fractions and compare their sizes (see image below). This visual representation helps students understand the concept of equivalent fractions and the relationship between numerator and denominator. It is also nice that you can resize the fraction bar as well as rotate the bar and fraction circle.
Additional resources that are nice to use include the ability to shade part of the page, coloring in specific units of the fraction (with a label), share the screen, as well as a link to how to use the site.
Embedded below is a 1 minute and 58 second YouTube tutorial.
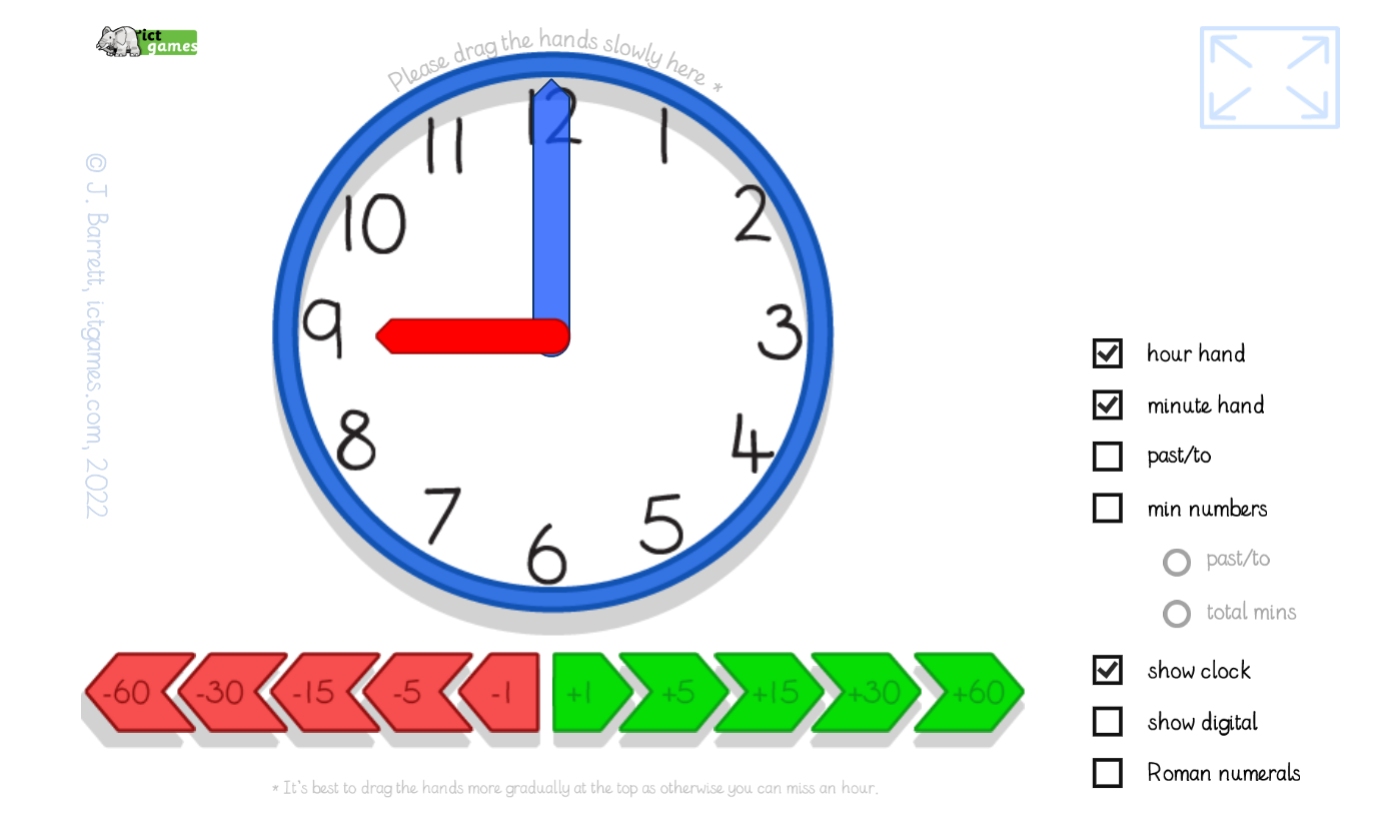
The Math Clock is a helpful tool for students who are learning to tell time and practicing their skills in math. It displays a traditional clock face with an hour hand, a minute hand, and a second hand. However, what makes this clock unique is that it also displays the time in digital format, and allows you to customize the clock to show different types of clocks, such as 12-hour or 24-hour clocks.
Here are the steps to use the Math Clock on the website:
Step 1: Visit the website https://www.mathlearningcenter.org/apps on your computer or mobile device and choose open web app.
Step 2: Once the Math Clock page is open, you will see options at the bottom of the screen and choose the clock with a +. To set and choose what type of clock you would like.
Step 3: Once you have set the clock to your desired settings, you can use it to practice telling time by asking yourself questions such as "What time will it be in 2 hours?" or "What time was it 30 minutes ago?"
Step 4: You can add a digital clock, a shade, and many more options.
Be sure to click on the i for more information on how to use the site.
Step 5: A really great final feature is to share the screen or an image of the screen with others by clicking on the share icon on the bottom right.
In addition to practicing time-telling skills, the Math Clock can also be used to teach other math concepts, such as fractions and angles. For example, you can ask questions like "What fraction of the clock does the hour hand cover when it's pointing to 3?" or "What is the angle between the hour hand and the minute hand when the time is 6:30?"
In conclusion, the Math Clock is a versatile and useful tool for students of all ages who are learning to tell time and practicing their math skills. By following these steps, you can easily use the Math Clock on the website https://www.mathlearningcenter.org/apps to enhance your math learning experience.
Embedded below is a 2 minute and 35 second YouTube tutorial.
If you have ever presented a Google Slides presentation and would like to be able to just use your voice to progress to the next slide, you are in luck.
Try adding the extension Next Slide, open a Slides presentation, tap on the extension, present the presentation by selecting Presenter View. You can then minimize the pop up screen and say, "Next Slide" when you want to go to the next slide.
Pretty handy!
Embedded below is a 1 minute and 35 second YouTube tutorial.
The extension Page Marker is a simple to use extension that allows you to draw, write, underline, as well as highlight information on a webpage.
Simply install the extension and then pin it to your extension list. Once you are ready to use it, simply select the icon and you will see the options you see below.
Click on the embedded 1 minute and 39 second YouTube vide below.
If you are in need of a screen shade for a presentation or to cover part of your screen during a lesson - give the extension CraftyShade a try.
When you select the extension you will see the ability to quickly show overlay (instantly covers your screen with the ability to shrink the shade). Or, the ability to hide the shade after a specified time.
Embedded below is a 1 minute and 25 second YouTube tutorial.
If you would like your class (or classes) to practice their typing and be able to keep their progress, give Typingclub.com a try.
To get started, make sure you enter into https://www.edclub.com/ and signup for your class and choose the free edition (or other if you wanted to try that).
Once you create your account you will need to add your first class. Please know you will need to add a class first and then you will see the ability to add through Google Classroom or Clever. Once you created your first class, take a look near the top of the classes page and choose Google Classroom. You can then import your class or classes.
I would recommend going into the settings and adjust what you would like (I removed the ability for students to see other's progress).
Place the link Typingclub.com into Classroom and have your students sign in with Google.
They can then start their typing and it will keep their progress!
If you are on a Windows-based device and would like a bit more room in your taskbar, you can remove it. What is really nice is that the search feature isn't gone - you just need to click on the Windows Icon and start typing.
In order to remove the search bar, simply right click in the taskbar and choose search and then Hidden.
Embedded below is a GIF followed by a 52 second YouTube tutorial.
If you have ever been typing on your Windows -based device and you meant to scroll up or down with your trackpad but it shows your desktop - here is how to fix it.
Select the Windows Icon (bottom left)
Settings icon
Devices
Touchpad
scroll down to Three-finger gestures
change it to nothing
You will also notice other options with your trackpad as well as sensitivity and scroll/zoom options.
Embedded below is a GIF followed by a 59 second YouTube tutorial.
Factmonster is a fun site to use to find some fun facts revolving around World, US, People, Math & Science, Language Arts, Homework, Tools, Teaching Resources, and Games!
Please note that when you click on a page it may state that it was last updated in 2017. When you click on a link, you will notice that the topic will show when that was updated. You will see an example in my 2 minute and 13 second embedded video below.
Many of us (and students) use Google to search for images. A few quick tips revolving around images.
A reminder when you are on the Google search page you will see the camera icon. This allows you to use Google Lens and the options you see below.
When you search for images in Google please note that if you want to make sure the image can be used without attribution, please select Tools and then usage rights.
When you see an image you will also see the Google Lens option again so that it will provide you with more information.
An extension that is beneficial is the View Image extension. This extension allows you to see the option of "View Image" in a new tab. This is a nice option as you are provided with a nice picture of it.
Embedded below is a 2 minute and 18 second YouTube tutorial.
If you would like a simple way to have anywhere between 2 and 9 dice, try the extension Really Good Dice.
Once you add the extension, simply click on it for a quick roll of one die. If you would like to add more dice, as well as sound, simply right-click on the extension and choose options.
Embedded below you will see a screenshot of the 9 dice as well as a 1 minute and 30 second YouTube tutorial.
Once you add the extension you will then see the options you see below. If you would like to have a color other than rose, cyan, or lime, make sure to choose the black rectangle and then select the color you would like.
What is really nice about this extension is the ability to quickly and easily enable and disable the highlighter.
Embedded below is a 1 minute and 26 second YouTube tutorial.
Google's pronunciation (built into search) is a very powerful tool. As a user, simply enter in the word you would like to hear pronounced (pronunciation of sherbet) and then you will hear the word said aloud, what it sounds like, as well as a "video" on how the mouth should move (see image below).
Embedded below is a 1 minute and 35 second YouTube tutorial.
A few ways that this tool can be used and why:
Learn correct pronunciation of words
One of the most obvious uses of Google's pronunciation tool is to learn the correct pronunciation of words. Simply type in the word you want to learn and the tool will provide an audio clip of how the word is pronounced. This can be especially helpful for learners who are studying a language that has a different phonetic system than their native language. By hearing the correct pronunciation, learners can begin to internalize the correct way to say words in their target language.
Practice pronunciation
In addition to using the tool to learn the correct pronunciation of words, learners can also use it to practice their own pronunciation. Simply record yourself saying a word or phrase and then listen to the audio clip provided by the tool to compare your pronunciation with the correct pronunciation. This can help learners identify areas where they need to improve and can provide a valuable tool for self-assessment.
Improve listening skills
Another way to use Google's pronunciation tool is to improve your listening skills. By listening to the audio clips provided by the tool, learners can begin to train their ears to recognize the sounds and intonations of their target language. This can be especially helpful for learners who struggle with understanding spoken language.
As a teacher, one of the most challenging tasks is to create engaging and interactive materials for students. With the advancement of technology, there are now many tools available that can help teachers make their lessons more fun and effective. One such tool that can be incredibly useful is a fill-in-the-blank generator. One such generator you can access by clicking on this link.
You can access a video tutorial by clicking below.
A fill-in-the-blank generator is a program that allows you to create custom sentences or paragraphs with blanks that students must fill in. This tool can be used in a variety of subjects, including language arts, science, history, and more. Here are some of the reasons why a fill-in-the-blank generator can be an excellent tool for teachers:
Enhances Learning: Fill-in-the-blank generators allow students to actively engage in the learning process. By filling in the blanks, students must recall information, think critically, and apply their knowledge to the task at hand. This type of active learning can be more effective than passive learning methods such as reading or listening to a lecture.
Provides Immediate Feedback: When students use a fill-in-the-blank generator, they receive immediate feedback on their responses. This feedback can help students identify areas where they need improvement and can also reinforce correct answers.
Customizable: Fill-in-the-blank generators are highly customizable. Teachers can create their own sentences and paragraphs to match the specific needs of their students. This tool can be used to create everything from simple vocabulary exercises to complex critical thinking tasks.
Saves Time: Creating materials from scratch can be time-consuming, but a fill-in-the-blank generator can save teachers a significant amount of time. By using a generator, teachers can quickly create materials that are engaging and effective without spending hours creating them from scratch.
Encourages Collaboration: Fill-in-the-blank exercises can be used as part of a group or collaborative learning activity. By working together to fill in the blanks, students can learn from one another and develop important teamwork skills.
In conclusion, a fill-in-the-blank generator is an incredibly useful tool for teachers. It enhances learning, provides immediate feedback, is customizable, saves time, and encourages collaboration. If you're looking for a way to make your lessons more interactive and engaging, consider using a fill-in-the-blank generator in your classroom.
If you are curious if a piece of literature that was submitted to you, click here for AI Text Classifier (by the creators of GPT3). While nothing is perfect, this will give you another resource to try.
Embedded below is a 1 minute and 46 second YouTube tutorial.
Thisissand.com is a very unique website that allows you to utilize your computer or mobile device as a place to create awesome sandscapes.
Enter into the site and start making your creation. In order to change the color make sure to select the color in the upper right and choose a new one.
It is a very relaxing site as you can just play with the sand and make whatever you would like.
In order to save the creation make sure to use a decent amount of sand, I had to make it go beyond the halfway point of the page.
Embedded below is a 1 minute and 29 second YouTube tutorial.
Tikolu offers the ability to have some fun with emojis by allowing the user to combine 2 emojis into one. An example I created is below. I combined a germ and covering your mouth.
Embedded below is a 1 minute and 2 second YouTube tutorial.
I asked opeanai on ways to use Emojimix and you can see an edited version below.
Emojis are a popular way to add some fun and personality to our online conversations, and Emojimix takes it to the next level by allowing users to create custom emojis. As a teacher, there are many ways you could use Emojimix in your classroom to engage your students and enhance their learning experience. Here are some ideas:
Storytelling: Have your students create custom emojis to represent characters, objects, and settings in a story they are reading or writing. They can use these emojis to illustrate key scenes and events, and share them with their classmates to help visualize the story.
Vocabulary Building: Use Emojimix to create visual representations of vocabulary words or concepts. For example, have students create emojis to represent different parts of speech.
Digital Citizenship: Emojis are a fun way to teach students about digital citizenship and appropriate online behavior. Have them create emojis to represent positive online interactions (e.g. kindness, empathy, respect), or to illustrate what cyberbullying looks like.
Classroom Management: Emojis can be a fun way to manage behavior in the classroom. Create a set of custom emojis that represent different levels of engagement, and have students use them to indicate how well they are understanding the material or participating in class.
Overall, Emojimix is a great tool for promoting creativity, communication, and engagement in the classroom. So why not give it a try and see how it can enhance your teaching and your students' learning experience?
The website Google Street View allows the users to explore some fun, weird, and wonderful things on Google Street View.
The user is presented with an "interesting" image (see below) with a small description and where it is located. You can then like the image as well, share the exact image with someone else, and then choose random to see another image.
Embedded below is a 55 second YouTube tutorial.
I decided to use openai to see how it would create a blog post revolving around using street view and ways educators could use it. See below for the response. It has some good ways to use Google's Street View as an educator (just remember to drop in Peg Man).
As a teacher, there are many resources available online that can be used to enrich your classroom experience and bring learning to life for your students. One such resource is the website "Wonders of Street View," which provides a fascinating and educational virtual tour of some of the world's most iconic landmarks and natural wonders.
Geography and Social Studies: Use the website to teach your students about geography and the world around them. The website includes a wide range of locations, from famous landmarks like the Eiffel Tower and the Taj Mahal, to natural wonders like the Grand Canyon and the Great Barrier Reef. Students can explore these locations using the street view feature and learn about the geography, history, and culture of each place.
Science: The website is also a great tool for teaching science. Students can explore natural wonders like Yellowstone National Park or the Amazon Rainforest and learn about the plants, animals, and ecosystems that exist there. They can also use the street view feature to explore science museums and other educational sites, and learn about different scientific concepts.
Art and Literature: Many of the locations on the website are famous for their cultural significance, such as the Louvre Museum in Paris or the Globe Theatre in London. You can use these locations to teach your students about art and literature, and to inspire them to create their own art or writing based on what they see.
Virtual Field Trips: With many schools still unable to go on in-person field trips, the website can be a great way to take your students on a virtual field trip. You can choose a location to explore as a class, and then have students write or present about what they learned.
Creative Writing: Finally, you can use the website to inspire creative writing assignments. For example, you could have your students choose a location from the website and write a descriptive paragraph or short story about what they see.
Overall, "Wonders of Street View" is a fantastic resource for teachers who want to bring the world into their classrooms. Whether you're teaching geography, science, art, or literature, the website offers a wealth of information and inspiration for your students. So why not give it a try today and see what wonders you can discover?
If you are anything like me, sometimes a video or a GIF along with directions is very much appreciated. A simple way to create a GIF is to use the website Gifcap.
Once you select start recording it will prompt you for the tab you would like to record.
When you are finished make sure to select stop sharing (under the URL in blue).
You can then edit, delete, or download.
Embedded below is a 2 minute and 15 second YouTube tutorial.