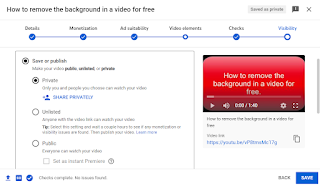
If you use YouTube to publish your videos, a nice "newish" feature that I just saw the other day is the ability to invite others to view a private video.
When you are choosing the visibility of your video, you will see under Private the ability to share the video privately with others (as long as they log in with their Google credentials).
If you would like to take the background out of a video for free, try using unscreen.com. Thanks to a friend of mine (Layla Lyons) for sharing this site with me - thank you!
To use unscreen, upload a video (if you used an iPhone you will need to convert it to an MP4). They have a very helpful link to explain it all. They recommend using a site known as Zamzar I used the site and it worked great.
When ready, upload the video and the background will be removed after a brief time. You can then change the background and download and/or share it.
Embedded below is a 1 minute and 40 second YouTube tutorial.
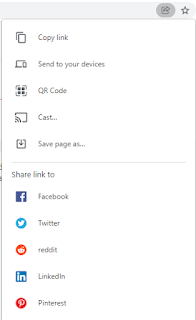
If you would like to share a particular page on Chrome - look to the right of the address bar for what looks like an arrow. Make sure to select the icon and you will see the options you see below.
This is a nice feature as it allows you to share the page you are on quickly and easily.
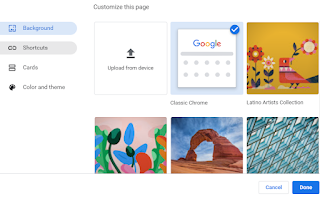
If you would like to customize your Google Chrome Color/Theme, Background, Shortcuts, and Cards, simply open a New Tab in Chrome and then choose to Customize Chrome in the bottom right of your screen.
You will then see the options you see below.
Embedded below is a 1 minute and 16 second YouTube tutorial.
If you use Gmail - sometime you want to be able to adjust the way the emails come in. Maybe you want all the unread first, or you want them to show in the order that they came.
In order to do this - select the settings gear in the upper right and then make your choice.
Eric Curts has created a great resource for those who would benefit from addition and subtraction practice. His creation utilizes google sheets and emojis to help practice basic facts. What I really like about it (other than the emojis) is that there are 2 "levels" for practice for both addition and subtraction. The first level allows for the students to type in a number (see the emojis that represent the number) and then add their second number and be able to count the number of emojis in the sum. The second level, while it shows the emojis representing the numbers, it does not show in the sum (or difference).
If you would like to create your own custom Wordle quickly and easily try using the website mywordle.me
When you are ready to create your own custom Wordle click on Make your Own Wordle and then enter in your custom word and generate the link and share with whomever you would like.
For those of you who are enjoying Wordle in your spare time, now it is time to take it to the classroom. Embedded below you will see @scott_teach's Tweet where he has used Excel and some conditional formatting to create a Wordle you can use with your class.
I would personally remove where it says where the Mystery Word is as well as instructions and share it once a day with students as a view only. Then they can make a copy and guess away on their own.
If you would like to create a checklist to be used in your classroom (or wherever), try using Google Docs. Embedded below I show you how to create a checklist that is ready to be shared with others (or printed out) in under 1 minute and 45 seconds.
When entering into your Doc, I like to go to do the following:
File> page setup and change the left and right margin to 0.1
Double click in the header, click on options and header format (blue on right side) to 0.1
Insert > Table (I chose a 4x4)
Right click on the 1st row and column and scroll to table properties
change the column width (I chose 5 inches)
Right click again on the first row and column and choose to add a row above (this will be important to add text above the three columns on the right).
Make sure to click on the top line on the left and change the border color to white (same with the side border color).
Now add your text where needed.
When ready to place your checkmarks - highlight the rows you would like and then choose the checkbox icon (it may be hidden in the three dots).
Embedded below is a 2 minute and 3 second YouTube tutorial.
In order to get started make sure you have Classrooms enabled by clicking on the three dots in the upper right of the home screen, choose account settings, and make sure to place a check next to Education Account.
You will now see Classrooms and make sure to select Create Classroom
Create your classroom by choosing Google Classroom, Microsoft, or Clever. Also, check the features you would like enabled and then choose create.
Students now have an account and can log on to Wakelet.com and choose Log in. In the example in the video I used Google.
Students can now create their own Collections, Bookmarks, and join Group Collections. (as you see below).
If a student does start their own collection and then wants to work with another student (or students) - you as the teacher need to go into the Classrooms page on Wakelet, choose the student's name in the class and then share the collection and choose to invite collaborators. Seer image below.
A reminder that collections created by students CAN NOT be shared publicly.
This can be a touch frustrating - especially if you want families to see their child's work. However, there is a solution.
The solution to being able to share work created by students would be to log on to your Wakelet account and create a collection. Example - Sydney's 2022 Portfolio.
You will then need to select share and choose how you would like to share the collection with the student (you can see the options below). Personally, I really like to send by code or send the link directly to the student in Google Classroom.
Now, the student can create their portfolio and you have the options to share the collection with others.
Embedded below is an 8:06 second YouTube tutorial where I take you through the steps of signing up as a teacher and what it all looks like from a teacher and student point of view.
If you have a lot of photos that you would like to mass delete it can be a bit difficult in Google Photos. Since it appears as you can only select one and then hold shift and scroll down to the bottom and all the photos should be highlighted in your view. The problem with that is the view only lets you highlight a few at a time.
If you would like to delete a few thousand at a time here is a simple tip:
shrink your screen using ctrl shift -
I shrank my screen to 25%
hold down shift and click on the first photo
let go of Shift
go to the bottom of your screen
hold Shift again and choose that image in the bottom right
you will see they are all highlighted blue and selected
you can then continue to scroll down and choose more
I was able to delete 8,000 photos at a time - not sure what the max is (if there is one)
Embedded below is a 1 minute and 6 second YouTube tutorial.
In my example I used Google, of course use what you need. Once you have completed your sign in make sure to scroll down to Classroom Sections.
You will see any sections (including archived ones).
When you create a new section you will see the following (I chose Google Classroom)
Once you choose how you want your students to sign in you will then need to edit your section details (don't worry you can always adjust by selecting the gear to the far right).
A rule of thumb for the courses is A=Kindergarten, B= 1st, C=2nd, and so on.
When you are ready to place the information for your students to sign in, I recommend the following links to be available for them:
important for students to be able to choose the course they would like. This is very important if they have used Code.org in the past and they are "stuck" on an old course.
A number of people recently have asked about the difference between commenting in a Doc and the words you see when you open a Google Doc - Type @ to insert.
In short, when you use the @ and then type in someone's name the following becomes available:
When you select share, it will then bring up the sharing settings.
Also, when you select their name in the Doc you will see the ability to quickly send an email, message, video call, and schedule an event. If you select to see the detailed view you will see the latest interactions as well as the other mentioned options.
When you select the comment feature you will see what you see below. If you would like, use the @ to include a person and send them an email (and assign the comment to them - see second image below).
Embedded below is a 1 minute and 52 second YouTube tutorial.