Wednesday, January 19, 2022

How to set up a rule in Outlook and have an email go directly into a specific folder.

 If you would like to set up a rule for a specific user or what the subject of the email contains, be sure to follow the steps below.

  • Select the email in question
  • Choose Rules at the top
    • Create a rule
  • You can then choose your options (I chose from the specific sender)
    • can also choose what the subject contains
    • as well as "Sent to"
  • You can then choose to send the email to a specific folder (can choose a previously made one or create a new one).
    • Can also choose to display a specific sound 
    • An important item to choose is to choose to Display in the New Item Alert Window
Embedded below is a 2:00 minute YouTube tutorial.


Take care,
Brad


Tuesday, January 18, 2022

Classrooms on Wakelet tutorial (student and teacher point of view). How to get your class up and running - plus a few tips and tricks

 Wakelet is an amazing platform that allows users to save, organize and share content from across the web with a single link and all for free.


A new amazing feature built into the platform is Classrooms. Classrooms allows you to work with students in a safe and secure way. To see Wakelet's blog post on this topic - please click here.

  • In order to get started make sure you have Classrooms enabled by clicking on the three dots in the upper right of the home screen, choose account settings, and make sure to place a check next to Education Account.
  • You will now see Classrooms and make sure to select Create Classroom 
  • Create your classroom by choosing Google Classroom, Microsoft, or Clever. Also, check the features you would like enabled and then choose create.

  • Students now have an account and can log on to Wakelet.com and choose Log in. In the example in the video I used Google.
  • Students can now create their own Collections, Bookmarks, and join Group Collections. (as you see below).
  • If a student does start their own collection and then wants to work with another student (or students) - you as the teacher need to go into the Classrooms page on Wakelet, choose the student's name in the class and then share the collection and choose to invite collaborators. Seer image below.

    • A reminder that collections created by students CAN NOT be shared publicly.
    • This can be a touch frustrating - especially if you want  families to see their child's work. However, there is a solution.
  • The solution to being able to share work created by students would be to log on to your Wakelet account and create a collection. Example - Sydney's 2022 Portfolio.
  • You will then need to select share and choose how you would like to share the collection with the student (you can see the options below). Personally, I really like to send by code or send the link directly to the student in Google Classroom. 

  • Now, the student can create their portfolio and you have the options to share the collection with others.
Embedded below is an 8:06 second YouTube tutorial where I take you through the steps of signing up as a teacher and what it all looks like from a teacher and student point of view.


Take care,
Brad


Monday, January 17, 2022

How to create a GIF from a video on YouTube

If you have ever watched a video on YouTube and you thought you could make part of that video and make it a GIF - here you go.

  • Copy the url of the YouTube video 
  • Paste the video into Gifrun.com
  • You will then need to find the specific part of the video where you would like the GIF to start
  • Adjust the time (up to 15 seconds)
  • You can then preview the GIF as well as the edit size, framer per second, as well as add text
  • You can then create your GIF and download if desired
Embedded below is a 1 minute and 38 second YouTube tutorial.


Take care,
Brad

Sunday, January 16, 2022

How to delete a lot of photos in Google Photos quickly

 If you have a lot of photos that you would like to mass delete it can be a bit difficult in Google Photos. Since it appears as you can only select one and then hold shift and scroll down to the bottom and all the photos should be highlighted in your view. The problem with that is the view only lets you highlight a few at a time.

If you would like to delete a few thousand at a time here is a simple tip:

  • shrink your screen using  ctrl shift -
    • I shrank my screen to 25%
  • hold down shift and click on the first photo
  • let go of Shift
  • go to the bottom of your screen 
  • hold Shift again and choose that image in the bottom right
    • you will see they are all highlighted blue and selected
  • you can then continue to scroll down and choose more
  • I was able to delete 8,000 photos at a time - not sure what the max is (if there is one)
Embedded below is a 1 minute and 6 second YouTube tutorial.


Take care,
Brad

Saturday, January 15, 2022

A few tips about Code.org and signing you and your class for accounts.

 If you are planning on using Code.org for you and your students - here are a few tips.

  • In my example I used Google, of course use what you need. Once you have completed your sign in make sure to scroll down to Classroom Sections.
  • You will see any sections (including archived ones).
  • When you create a new section you will see the following (I chose Google Classroom)

  •  Once you choose how you want your students to sign in you will then need to edit your section details (don't worry you can always adjust by selecting the gear to the far right).
    • A rule of thumb for the courses is A=Kindergarten, B= 1st, C=2nd, and so on. 
  • When you are ready to place the information for your students to sign in, I recommend the following links to be available for them:

Embedded below is a 2 minute and 49 second YouTube tutorial.


Take care,
Brad


Friday, January 14, 2022

Google Docs - The differences between using the @ in a Doc and commenting.

A number of people recently have asked about the difference between commenting in a Doc and the words you see when you open a Google Doc  - Type @ to insert.

In short, when you use the @ and then type in someone's name the following becomes available:


When you select share, it will then bring up the sharing settings.

Also, when you select their name in the Doc you will see the ability to quickly send an email, message, video call, and schedule an event. If you select to see the detailed view you will see the latest interactions as well as the other mentioned options.


When you select the comment feature you will see what you see below. If you would like, use the @ to include a person and send them an email (and assign the comment to them - see second image below).


Embedded below  is a 1 minute and 52 second YouTube tutorial.


Take care,

Brad

Thursday, January 13, 2022

Images not showing in Google Docs/Slides/etc? Here is one solution.

 If you (or a student in your class) do not see images in their Google Slide/Doc/etc - here is one solution.

  • Look to the right of the address bar for a red x
  • Click on the x
  • When the pop up window comes up - choose to allow images
Embedded below is a 22 second YouTube tutorial.


Take care,
Brad


Thursday, December 16, 2021

Quick way to check the spelling of a word (use the tab in Google Chrome and choose the mic) 🎤

 While there are numerous ways for you (or your students) to check spelling, 1 simple way is to open a new tab in Google Chrome. When you do say make sure to select the microphone on the far right of the search bar.

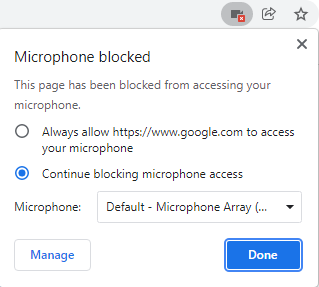
When you do so, it may state 

  • that voice search has been turned off (see image below).
    • to correct this look in the upper right of your search bar for the red x over a video icon. Make sure to allow and choose your microphone.


    • to correct this go into settings > privacy and security > site settings > scroll to microphone and select it > sites can ask to use your microphone

  • make sure to Allow the use of your microphone

Give it a try and ask your students some tough words! 

Embedded below is a 1 minute and 31 second YouTube tutorial.


Take care,
Brad


In Safari, 2 ways to have your address bar go back to the top of your screen.

 In Safari, there are 2 ways to have your search bar go back to the top of your screen. For the record, it did take a bit of time to get accustomed to the search at the bottom; however, I really like the ability to go to tabs easily.

  • on the left of the search bar you will see 2 letter As. Select them and then choose to Show Top Address Bar.
  • the second way is to select Settings > Safari > Tabs > choose Single Tab
Embedded below is a 47 second YouTube tutorial.


Take care,
Brad

Monday, December 13, 2021

How to access links from URL shorteners like bit.ly and tinyurl.com that are blocked at your school/office

 If you have a link to a website that can not be reached (see image below), chances are it is blocked because it is from a shortened URL (like bit.ly or tinyurl.com). 

A URL shortener takes a long link and turns it into a shorter, easy-to-share one. The problem with URL shorteners is that they hid the true link  which from a network security standpoint makes hard to verify that it is safe. However, if you feel the website is safe, you can unshorten the link using the directions below.

  • Go to https://urlex.org/
  • Copy and paste the link into the text box.
  • Press "Expand"
  • The website will "expand" the shortened URL so you can view the site (as long as it is appropriate).
Embedded below is a 1 minute YouTube tutorial.


Take care,
Brad

Wednesday, December 8, 2021

How to create a GIF from a video on YouTube

 If you have ever wanted to create a GIF directly from YouTube simply copy the URL and paste it in Gifrun.com

From there you will have to go to the specific part of the video where you would like your GIF to start and then choose the number of seconds (up to 15).  You can add text as well if you would like to. 

When ready, simply select Create GIF.

Embedded below is a 1 minute and 38 second YouTube tutorial. Go Birds!!


Take care,

Brad

Tuesday, December 7, 2021

Rearrange pages, add a watermark, password protect your PDF, etc.

 PDFcandy is an outstanding tool when working with PDFs. Take a look below at all that you can do with the site.


The one that I focus on in the video below is the rearrange pages option. For those of us that have used Kami in the past, we know how helpful it is to have this option. Well, with PDFcandy you can do the same thing.  Once you upload your PDF you can remove pages as well as move them around as you would like. 

Embedded below is a 1 minute and 32 second YouTube tutorial.


Take care,
Brad


Hour of Code - sign up as a teacher, sign up students, and additional resources.

Happy Computer Science Education week!


In this post we will take a brief look (and a brief video) at how you can quickly enroll as an educator, enroll your students to the proper course, as well as additional resources.


  • Log onto Hour of Code
  • In the upper-right select Sign in (in this example I am using Google)
    • make sure to got through the rest of the sign-in process
  • Scroll down to where it says Classroom sections
    • if for some reason you do not see the Classroom sections make sure to select the My Dashboard in the upper left of your screen.
  • Choose to create a section
  • Choose how you want your students to sign-in (in this example a reminder that I am using Google Classroom).
  • You will then need to choose a course.
  • If you would like to show your students the course you chose - make sure to click the link above (also can click here) and choose view course.
    • On the right hand side you can view as a student.
  • Your students are all set. Just make sure to post in a link in your LMS so it is easy for them to go directly to their course. 

  • I would also recommend pasting this link in your LMS as well. As students will be able to have access to numerous activities.
Embedded below is a 2 minute and 16 second YouTube tutorial.


Take care,
Brad


Monday, December 6, 2021

How to create a contact group in Gmail

 If you would like to create a contact group in Gmail, follow the instruction below:

  • enter into contacts.google.com
  • on the left-hand side choose create Label
  • name your label
  • choose the individuals you would like to add to your label by clicking to the left of their name
  • select the label icon at the top and choose apply
You can now enter into Gmail and type in the name of your label and email the individuals you would like to.

Embedded below is a 1 minute and 9 second YouTube tutorial.


Take care,
Brad

How to add audio to Google Form responses using Mote. Can also use in documents, emails, presentations.

 If you would like to add audio to a Google Form (or documents, emails, presentations) try using the extension Mote. In this example we will be adding audio to a Google Form (new release).

Once you add the extension and go through the sign-up process make sure you open up a Google Form.

When you open up the form you will see the Mote icon built into your form. 

Now, when you add the specific audio you would like to add, you will notice it does not come directly into the form itself. You will need to enter back into the extension and choose My recent motes and select the share icon.

Once you select the share icon you can then copy the link and paste it next to where you would like it to appear. You will see the link and when you preview the form you will see the ability to play the audio.

Embedded below is a 2 minute and 21 second YouTube tutorial.


Take care,

Brad


Remove objects and defects from your pictures for free using cleanup pictures.

 If you would like to remove certain objects/defects from your pictures, try using the website cleanup.pictures.

Once you enter the site simply upload (or drag) the image and then choose the width of the brush and remove the object. 

To see the original picture, press down on where it says original and you will then see a fast scroll bar. 

This could be fun especially if you would like to compare one image with another with your students.

Embedded below are 2 pictures as well as a 1 minute and 31 second YouTube tutorial.


Take care,

Brad

Thursday, December 2, 2021

Alarms, World Clock, Timer, and a Stopwatch all available on your Dell Notebook

 If you have a Dell notebook and are in the need to set an alarm, see what time it is in places all over the world, a timer and a stopwatch - you are in luck!

  • With the alarm you can set and name any number of alarms as you would like to. You can also change the sound of the alarm(s) as well.

  • The World Clock is great because you can see the time where you are and see the time from any major city throughout the world as well. Pretty cool, especially if you are studying cities around the globe.

  • The timer is great as you can set numerous timers and name them. You can also have the timer go full screen.

  • The stopwatch you can start and have it go full screen. You can also use it for Laps/Splits.
Embedded below is a 2 minute and 17 second YouTube tutorial.


Take care,
Brad

Wednesday, December 1, 2021

New features on your Chromebook (Dec 1, 2021) Create a video, scan a document, and a QR reader.

Good news for all you Chromebook users - you and your students have the ability to take a video, scan a document (and save as a PDF or photo), a timer for your camera (3 seconds), as well as a QR code reader.

To find the new features, choose the launcher on the bottom left of your device and choose the camera icon. From there you will see the options to shoot a video, choose a timer (left side), as well as scan a document and a QR code.

One thing to point out, for scanning the document - make sure you have plenty light. While not perfect, it is a nice feature to have.

Embedded below is a 2 minute and 1 second video.


Take care,

Brad

Wednesday, November 24, 2021

How to create a translated copy of your original Google Doc to share easily with others.

A friend of mine today shared with me how she uses Google Docs to create her newsletters for school and then has a copy of it instantly translated.

To have your document translated:

  • select Tools
  • translate document
  • choose the language desired
This will now create a copy of your document with the translation.

Embedded below is a 54 second YouTube tutorial.


Adios, Arrivederci,  Au Revoir, Adeus, Auf Wiedersehen, Sayōnara, Do svidaniya, Annyeong.

Brad


Tuesday, November 23, 2021

How to copy a specific part of an article and share that with others in Google Chrome.

 If you would like to send a certain section of an article in Google Chrome you can now highlight the text and then right-click and choose Copy link to highlight (see image below).


Embedded below is a 49 second YouTube tutorial.


Take care,

Brad