Thursday, March 30, 2023

Looking for 18+ engaging, inspirational, and free social-emotional learning activities delivered to your inbox by 7:00 am every day? Sign-up for the First Five by Edtomorrow.

While I have shared many posts in the past, this may be the most important one. A site like you see below has the power to make people think, smile, laugh, and even possibly change the course of someone's life.

This morning a friend of mine asked me if I ever heard of the first five? I thought he meant daily five, but I asked him to show me. Well, I am so glad he did.  Edtomorrow offers The First Five which are  inspirational, and free social-emotional learning activities delivered to your inbox by 7:00 am every day (click here for the form). Embedded below are some of the examples they send to you. Click here for the sample as well. They include a meme, questions to facilitate discussions, greetings at the door examples, a quick connect that you could easily extend into a writing prompt, self check-in (using The Rock), Mindfulness, Positivity, Character Quote, and an inspirational video.

When you receive your email in the morning you will see two different options to choose Primary (K-5) or Secondary (6-12).

** For some reason when you sign up, you may see that the operation timed out and to please try again. If you see this, feel free to try again; however, I just signed up through my phone and it sent to my school email.**

Also, if you do not see your email at 7:00 am the next day, make sure to check your Junk mail and then allow the email (if using Outlook simply right click on the email - Junk - Never Block Sender).

I really hope you take the time to sign-up for this site. Remember how powerful it is when someone has motivated you - you are that motivator for those kids out there needing to hear or read what you share! 


Embedded below is Edtomorrow's YouTube tutorial followed by mine.


Wednesday, March 29, 2023

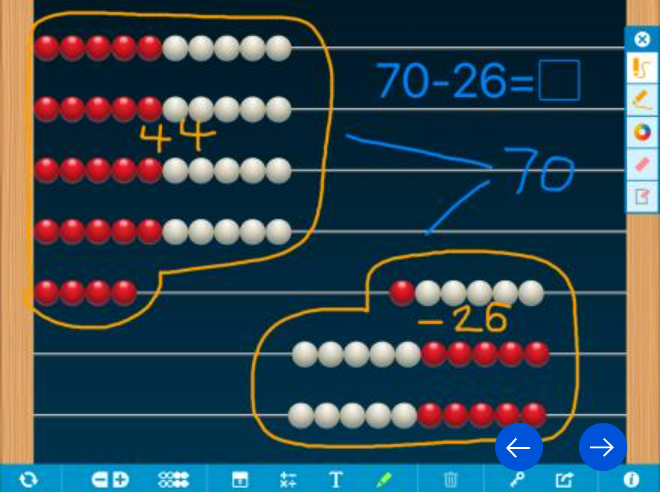
Virtual NUMBER RACK Slide beads to show and work with numbers and think in groups of 5s and 10s.

 Mathlearningcenter has a nice and simple site to use - Number Rack. 

The site starts with two racks having 5 red beads and 5 white beads which allow you to slide them back and forth. This is really helpful as you can show different ways to represent addition and subtraction problems.


You can also had up to 10 total racks (racks 6-10 have the reverse colors of the beads).

Embedded below is a 2 minute and 20 second YouTube tutorial.


Take care,

Bra

Tuesday, March 28, 2023

Virtual NUMBER LINE Visualize and work with numbers in sequence on a virtual number line with or without tick marks.

 The website created by the Mathlearningcenter Number Line allows users to have a number line with settings for whole numbers, fractions, decimals, and no numbers at all (along with a choice for spacing).


As a user you can then select to add "jumps" where you have the ability to spread out the jump to the size you would like. If you grab the right side and take to the left it will "jump" backwards. You also have the possibility to add jump labels and line masking as well as to add a custom tickmark.

Embedded below is a 1 minute and 55 second YouTube tutorial.


Take care,
Brad


Monday, March 27, 2023

Virtual NUMBER FRAMES. Represent numbers by placing counters inside of five-, ten-, double ten-, and custom frames.

 Mathlearningcenter's number frames provides a way for you to represent counters and custom frames.

In the upper left of the site you will select your frame (default is 5x5) but you can adjust anywhere between 1x1 to 12x12.

You then will see red counters (1, 5, 10) that you can drag either to the grid or the page itself (outside of the grid).

You will see the same with blue counters below that.

At the bottom left of the screen you will see the ability to change counters to make them more kid-friendly.

Along the bottom of the screen you will see 

  • the ability to clear the screen
  •  rotate the frame
  • darken the grid lines
  • fill the icon (change the icon's color)
  • use a cover
  • math text tool
  • writing tool
  • drawing tool
  • duplicate
  • trash
  • open shared work
  • share work
  • information
Embedded below is a 2 minute and 29 second YouTube tutorial.


Take care,
Brad

Sunday, March 26, 2023

Virtual NUMBER CHART! Count, explore number patterns, or create your own grid with fractions, decimals, and more.

 Mathlearningcenter's number chart is a very helpful site for teaching place value using a grid with fractions, decimals, patterns, or whole numbers.

If you look at the bottom of the site you will see a setup that allows you to setup your grid the way you would like it.

On the left side you will see options for stamping, stamping every..., erasing a number, etc.

You also have choral counting which you can let auto play or move ahead at your pace.

You of course have the ability to share the screen with others as well as play some games.

Embedded below is a 2 minute and 29 second YouTube tutorial.


Take care,

Brad

Saturday, March 25, 2023

Deepen understanding of key terms in mathematics with written and visual definitions using mathlearningcenter.org/apps

Math Vocabulary Cards website by the Math Learning Center is a great resource for students and teachers to improve (or help others to improve) their math vocabulary skills. The Math Vocabulary Cards website is a digital tool designed to help students build math vocabulary by providing clear definitions, illustrations, and examples.

Let's dive in and explore the different features and benefits of this website.

Step 1: Access the Website

Step 2: Choose a Topic

  • Once you have accessed the website, you will be presented with a list of math topics to choose from. You can select the topic that you are currently studying or want to learn more about. The topics are organized by grade level, so you can easily find the relevant content.

Step 3: Choose a Vocabulary Card

  • After you have selected a topic, you will be presented with a list of vocabulary cards. Each card has a term, definition, and an illustration or example to help you understand the term better. You can scroll through the list of cards and choose the ones that you want to learn.

Step 4: Use the Vocabulary Cards

  • Once you have chosen a vocabulary card, you can use it to improve your math vocabulary skills. There are several ways to use the cards, including:
    • Reading the term, definition, and example out loud to help you remember the term.
    • Creating flashcards with the vocabulary words and their definitions.
    • Practicing using the vocabulary words in math problems.
    • Quizzing your students, yourself, or a friend on the definitions of the terms.
    • Using the illustrations to help you understand the concept visually.

The Math Vocabulary Cards website is an excellent resource for students and teachers to improve their math vocabulary skills. By following the steps outlined above, you can use the website to learn new terms, understand their definitions, and practice using them in math problems. 

Embedded below is a 2 minute and 19 second YouTube tutorial.


Take care,

Brad

Friday, March 24, 2023

Visualize money values and relationships with U.S. currency and money value pieces using Mathlearningcenter's site.

 The website https://apps.mathlearningcenter.org/money-pieces/ is a great resource for teaching children about money and currency values. It features interactive tools that make learning about money fun and engaging for students. Here's a brief guide on how to use the website effectively:

Understanding the Layout:

When you first open the website, you'll notice that it is divided into two. The left side displays different denominations of coins and bills. The middle section is where you can interact with the different money pieces.

Using the Money Pieces:

The Money Pieces section is where you can drag and drop the different coins and bills to create different amounts. You can use this section to practice counting money, making change, and comparing values of different currencies. For example, you can drag a quarter and a dime to the middle section to create a total value of 35 cents.

In order to exchange money, make sure you circle the coins in question to exchange for larger coins or dollars.

You can also toggle the money grids off and on.

Embedded below is a 2 minute and 17 second YouTube tutorial.


Take care,

 Brad

Thursday, March 23, 2023

Teaching polygons, line segments, area, and/or perimeter? Try stretching virtual bands around pegs on a Geoboard.

Today I will be sharing a step-by-step guide on how to use the Geoboard site. The G https://apps.mathlearningcenter.org/geoboard/ Geoboard is an online tool that helps students visualize and explore geometry concepts using a virtual geoboard. This site is created by the Math Learning Center and is a great resource for teachers and students alike.

Step 1: Access the Site

To begin, open up your web browser and navigate to the Geoboard site: https://apps.mathlearningcenter.org/geoboard. Once you have accessed the site, you will see a blank grid with dots on it. This is your virtual geoboard.

Step 2: Create Shapes

To create shapes, click on the dots on the grid to create the vertices of your shape. You can also click and drag to create lines connecting the vertices. You can create any shape you want, from simple triangles to complex polygons.

Step 3: Explore Geometry Concepts

Once you have created a shape, you can use it to explore geometry concepts. For example, you can measure the sides and angles of the shape, and calculate its perimeter and area. You can also explore concepts such as symmetry, congruence, and similarity.

Step 4: Customize Your Geoboard

The Geoboard site also allows you to customize your geoboard. You can change the size of the grid, the color of the dots, and the thickness of the lines. You can also toggle the display of the grid and the axes.

Step 5: Save and Share

Finally, you can save your creations and share them with others. To save your geoboard, click on the "Save" button and give your creation a name. To share your geoboard, click on the "Share" button and copy the link to your creation. You can then share the link with your students or colleagues.

The Geoboard site is a powerful tool for exploring geometry concepts. By following these five simple steps, you can create shapes, explore geometry concepts, customize your geoboard, and save and share your creations. I hope you find this guide helpful and that you enjoy using the Geoboard site in your teaching and learning.

Embedded below is a 2 minute and 23 second YouTube tutorial.


Take care,

Brad

Wednesday, March 22, 2023

Teaching Fractions? Try Mathlearningcenter and Represent fractions with denominators from 1 to 100 with circle and bar models.

 Hello everyone, I am excited to share with you some of my thoughts and experiences on teaching fractions and using the website https://apps.mathlearningcenter.org/fractions/.

Fractions can be a challenging topic for some students, but with the right resources and support, they can become confident in their understanding of this important concept. One of the resources that I have found to be particularly helpful in teaching fractions is the website https://apps.mathlearningcenter.org/fractions/.

This website offers a variety of interactive activities and games that help students visualize and manipulate fractions. One of my favorite features is the "Fraction Bars" tool, which allows students to drag and drop colored bars to represent fractions and compare their sizes (see image below). This visual representation helps students understand the concept of equivalent fractions and the relationship between numerator and denominator. It is also nice that you can resize the fraction bar as well as rotate the bar and fraction circle.


Additional resources that are nice to use include the ability to shade part of the page, coloring in specific units of the fraction (with a label), share the screen, as well as a link to how to use the site.

Embedded below is a 1 minute and 58 second YouTube tutorial.


Take care,

Brad

Tuesday, March 21, 2023

Teaching Time? Try this free site for exploring time, fractions, and more on virtual clocks with geared or free-moving hands.

Today, we will be learning about how to use the Math Clock on the website https://www.mathlearningcenter.org/apps.

The Math Clock is a helpful tool for students who are learning to tell time and practicing their skills in math. It displays a traditional clock face with an hour hand, a minute hand, and a second hand. However, what makes this clock unique is that it also displays the time in digital format, and allows you to customize the clock to show different types of clocks, such as 12-hour or 24-hour clocks.

Here are the steps to use the Math Clock on the website:

Step 1: Visit the website https://www.mathlearningcenter.org/apps on your computer or mobile device and choose open web app.

Step 2: Once the Math Clock page is open, you will see options at the bottom of the screen and choose the clock with a +. To set and choose what type of clock you would like. 

Step 3: Once you have set the clock to your desired settings, you can use it to practice telling time by asking yourself questions such as "What time will it be in 2 hours?" or "What time was it 30 minutes ago?"

Step 4: You can add a digital clock, a shade, and many more options. 

Step 5: A really great final feature is to share the screen or an image of the screen with others by clicking on the share icon on the bottom right.

In addition to practicing time-telling skills, the Math Clock can also be used to teach other math concepts, such as fractions and angles. For example, you can ask questions like "What fraction of the clock does the hour hand cover when it's pointing to 3?" or "What is the angle between the hour hand and the minute hand when the time is 6:30?"

In conclusion, the Math Clock is a versatile and useful tool for students of all ages who are learning to tell time and practicing their math skills. By following these steps, you can easily use the Math Clock on the website https://www.mathlearningcenter.org/apps to enhance your math learning experience. 

Embedded below is a 2 minute and 35 second YouTube tutorial.


Take care,

Brad

Monday, March 20, 2023

Use this extension to progress from slide to slide with just your voice.

 If you have ever presented a Google Slides presentation and would like to be able to just use your voice to progress to the next slide, you are in luck.

Try adding the extension Next Slide, open a Slides presentation, tap on the extension, present the presentation by selecting Presenter View. You can then minimize the pop up screen and say, "Next Slide" when you want to go to the next slide.

Pretty handy!

Embedded below is a 1 minute and 35 second YouTube tutorial.


Take care,

Brad 

Sunday, March 19, 2023

How to easily draw, underline, highlight, or type directly on top of a webpage using an extension.

 The extension Page Marker is a simple to use extension that allows you to draw, write, underline, as well as highlight information on a webpage.

Simply install the extension and then pin it to your extension list. Once you are ready to use it, simply select the icon and you will see the options you see below.


Click on the embedded 1 minute and 39 second YouTube vide below.


Take care,
Brad


Saturday, March 18, 2023

Need a temporary screen shade to cover parts of your screen? Try the extension CraftyShade.

 If you are in need of a screen shade for a presentation or to cover part of your screen during a lesson - give the extension CraftyShade a try.

When you select the extension you will see the ability to quickly show overlay (instantly covers your screen with the ability to shrink the shade). Or, the ability to hide the shade after a specified time.


Embedded below is a 1 minute and 25 second YouTube tutorial.


Take care,

Brad

Friday, March 17, 2023

Typingclub.com How to sign-up as a teacher and get your class started using Google Classroom. (Clever is an option as well)

 If you would like your class (or classes) to practice their typing and be able to keep their progress, give Typingclub.com a try.

To get started, make sure you enter into https://www.edclub.com/ and signup for your class and choose the free edition (or other if you wanted to try that).

Once you create your account you will need to add your first class. Please know you will need to add a class first and then you will see the ability to add through Google Classroom or Clever. Once you created your first class, take a look near the top of the classes page and choose Google Classroom. You can then import your class or classes.

I would recommend going into the settings and adjust what you would like (I removed the ability for students to see other's progress).

Place the link Typingclub.com into Classroom and have your students sign in with Google.

They can then start their typing and it will keep their progress!

Embedded below is a 2 minute video tutorial.


Take care,

Brad

Thursday, March 16, 2023

How to access Picture in picture for a YouTube video.

 If you like to watch videos on YouTube; however, you would like to do some work on the same screen - you are in luck.

On the video you would like to watch, quickly right click two times on the video. 


Once you select Picture in picture you can now take this video and place it where you would like on your screen and/or adjust the size of the video.

Embedded below is a GIF followed by a 46 second YouTube tutorial.


Take care,
Brad


Wednesday, March 15, 2023

On a Windows-based device, here is how to free up some of the room in your taskbar. Hint - you don't really need that search bar.

If you are on a Windows-based device and would like a bit more room in your taskbar, you can remove it. What is really nice is that the search feature isn't gone - you just need to click on the Windows Icon and start typing.

In order to remove the search bar, simply right click in the taskbar and choose search and then Hidden.


Embedded below is a GIF followed by a 52 second YouTube tutorial.


Take care,
Brad

Tuesday, March 14, 2023

Ever try scrolling on a website and all of a sudden you are taken to your desktop? That and other solutions in this tutorial.

 If you have ever been typing on your Windows -based device and you meant to scroll up or down with your trackpad but it shows your desktop - here is how to fix it.

  • Select the Windows Icon (bottom left)
  • Settings icon
  • Devices
  • Touchpad
    • scroll down to Three-finger gestures
    • change it to nothing
You will also notice other options with your trackpad as well as sensitivity and scroll/zoom options.

Embedded below is a GIF followed by a 59 second YouTube tutorial.


Take care,
Brad


Monday, March 13, 2023

Factmonster is a free reference site for students, teachers, and parents. Get homework help, find fun facts, and play games!

 Factmonster is a fun site to use to find some fun facts revolving around World, US, People, Math & Science, Language Arts, Homework, Tools, Teaching Resources, and Games!

Please note that when you click on a page it may state that it was last updated in 2017. When you click on a link, you will notice that the topic will show when that was updated. You will see an example in my 2 minute and 13 second embedded video below.


Take care and enjoy playing Simon Says! 😉
Brad


Sunday, March 12, 2023

On a Windows device how to quickly go to the desktop and how to quickly lock your screen.

 If you use a Windows based device, here are 2 shortcuts that will definitely save you time. 

  • Windows Key + D
    • This will quickly take you to the desktop. This is great because you don't have to close out your window to go to your desktop.
    • To go back to the window you were using, simply select the Windows Key + D to go right back.
  • Windows Key + L
    • This will allow you to quickly lock your screen.
    • This is helpful especially when you need to step out for a few minutes and you do not want to leave your computer unlocked.
Embedded below is a 29 second YouTube tutorial.


Take care,
Brad

Saturday, March 11, 2023

A few tips and tricks when it comes to using Google images.

Many of us (and students) use Google to search for images. A few quick tips revolving around images.

  • A reminder when you are on the Google search page you will see the camera icon. This allows you to use Google Lens and the options you see below.

  • When you search for images in Google please note that if you want to make sure the image can be used without attribution, please select Tools and then usage rights.
  • When you see an image you will also see the Google Lens option again so that it will provide you with more information.
  • An extension that is beneficial is the View Image extension. This extension allows you to see the option of "View Image" in a new tab. This is a nice option as you are provided with a nice picture of it.
Embedded below is a 2 minute and 18 second YouTube tutorial.


Take care,
Brad