Thursday, November 17, 2022

How to Animate Your Voice for Free with Adobe Express

 If you (or your students) would like to add a character to your voice, give Adobe Express a look (click here for a direct link).

When you enter into the site, you can start creating your animation right away; however, I would recommend creating a free account so you can download the creation.

When you do start creating the animation you will see the page that you see below. You can start to record right away; however, you also have the options to the right to change your character, background, as well as size.


Once you have made your selections, you will then be able to record your voice (or upload an audio file)  up to 2 minutes in length. You can then see the created animation and then have the option to trim some of the video from the beginning or end of the creation.

You can then download the creation and share it where you would like.

Embedded below is a 2 minute and 9 second YouTube tutorial.


Take care,
Brad

Wednesday, November 9, 2022

What Am I Thankful For? Google Slide project by Eric Curts

 If you are looking for a project to do with your classroom, try Eric Curts' What Am I Thankful For? 

As with all of Eric's posts, he includes a video tutorial as well as step-by-step directions.

  • Make sure you click on the Google Slides template Google Slides link you will then need to make a copy of the entire slideshow.
    • If using Google Classroom be sure to make it an assignment and force a copy to each student.
  • You will then see the presentation with directions available on the first few slides.
    • The turkey is on slide #7.
  • On slide #8 you will see the feathers.
    • Make sure to remind your students to copy the feather (ctrl c) and then paste (ctrl v) onto slide #7.
    • The students can then edit the text and state what they are thankful for.
  • They will then need to move the feather to the appropriate area as well as tilt the feather as well (look for the blue circle that allows you to tilt). You may need to remind them how to do this, especially with younger users.
  • They will then need to send the feather to the back. 
    • To do this they can either right-click or select the feather and tap on their touchpad and select order send to back.
When completed, students can download to their computer (download as a PNG image) - or if they turned in the project you can choose to download the Turkey as a PNG image by going to File - Download - PNG image.

Embedded below is an example of a Thankful Turkey as well as a 1 minute and 43 second YouTube tutorial.


Take care,
Brad


Tuesday, October 25, 2022

Free screen recorder with unlimited videos and up to 40 minutes in length - LOOM

 With Screencastify's new plan, many people have reached out asking for alternatives. 

  • Please note Screencastify does allow 10 videos for free that are still stored in your Google Drive. However, if you delete in Screencastify, it deletes the same video in your Google Drive account. 
    • You can go in to your Drive account and make a copy of videos you want to keep and then delete in Screencastify.
While there are many alternatives to Screencastify, the most robust one is Loom. The free version of Loom allows up to 25 videos and 5 minutes in length. However, Loom for Education allows unlimited videos and up to 40 minutes in length. To sign up for an education account - click here.

To get started with Loom, make sure to logon to the site and create your account. Choose your signup method (I used Google) and then (if you use Chrome) add their easy to use extension by clicking here.
 
Again, if you are an educator, make sure to fill out the Google Form and within 2 days you will be upgraded to an education account  (I had a friend who filled out the form and within 2 hours was upgraded).

In the next post I will share how to record with Loom and a few tips and tricks.

Embedded below is a 1 minute and 56 second YouTube tutorial followed by a 2 minute and 8 second tutorial showing how to make your first recording.


Take care,
Brad

Friday, October 7, 2022

Need practice writing (print or cursive) with pre-made and customizable sheets - try Handwritingpractice.net

 If you are in need of practice writing (print or cursive) with pre-made and customizable sheets, check out handwritingpractice.net.

You will see the options at the top of the screen for handwriting, print, cursive, D'Nealian, and custom practice writing.

Embedded below is a 57 second YouTube tutorial.


Take care,

Brad
Thursday, October 6, 2022

TinyWow.com - Free website with a huge selection of tools for working with PDFs, videos, images, etc

 If you have ever needed to convert and image, video, or file take a look into Tinywow.com. It is a free website that is very user friendly.

At the top of the page you will see the different items you can convert that then shows all of the different file types you can convert your file to.

I used this with a fellow teacher recently when she needed her pictures she took converted from her iPhone (HEIC) to a JPG.

Embedded below is a 1 minute and 21 second YouTube tutorial.


Take care,

Brad


Create fun custom charts! Eye chart, road sign, medal maker, etc.

 If you are looking for a fun poster in your room or a fun graphic in your presentation, take a look at Custom Eye Chart Maker. Make sure to fill in the details and click Make Chart! 

There are numerous other charts as well, including the following:

Embedded below is a 55 second YouTube short.

Take care,
Brad

"What browser am I using?" "What's my operating system?" Try whatsmybrowser.org

 If you have ever been asked what your browser is, or operating system, etc. (or maybe you need to ask someone to do this for you) - try out whatsmybrowser.org.

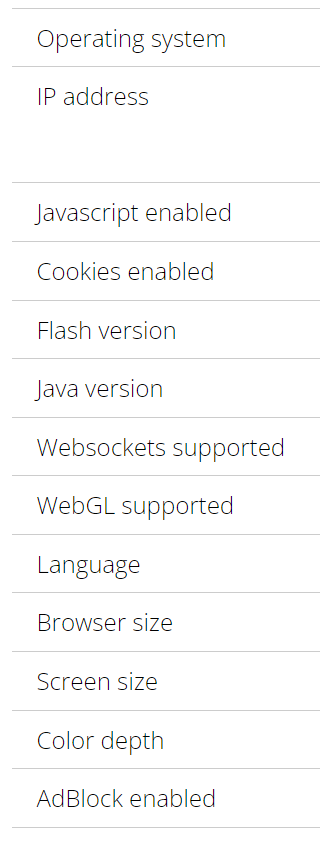
You will instantly see the browser as well as the options you see below. Please be careful to not share your IP address with just anyone. 

You can copy the information as well and share with whomever you need to. It will not share your IP address.


Embedded below is a 43 second YouTube tutorial.


Take care,

Brad

Wednesday, October 5, 2022

Classrooms in Wakelet from a Teacher and Student Point-of-View.

  Wakelet is an amazing platform that allows users to save, organize and share content from across the web with a single link and all for free.


A new amazing feature built into the platform is Classrooms. Classrooms allows you to work with students in a safe and secure way. To see Wakelet's blog post on this topic - please click here. You can also see James and Amy's video tutorial.


  • In order to get started make sure you have Classrooms enabled by clicking on the three dots in the upper right of the home screen, choose account settings, and make sure to place a check next to Education Account.
  • You will now see Classrooms and make sure to select Create Classroom 
  • Create your classroom by choosing Google Classroom, Microsoft, or Clever. Also, check the features you would like enabled and then choose create.

  • Students now have an account and can log on to Wakelet.com and choose Log in. In the example in the video I used Google.
  • Students can now create their own Collections, Bookmarks, and join Group Collections. (as you see below).
  • If a student does start their own collection and then wants to work with another student (or students) - you as the teacher need to go into the Classrooms page on Wakelet, choose the student's name in the class and then share the collection and choose to invite collaborators. Seer image below.

    • A reminder that collections created by students CAN NOT be shared publicly.
    • This can be a touch frustrating - especially if you want  families to see their child's work. However, there is a solution.
  • The solution to being able to share work created by students would be to log on to your Wakelet account and create a collection. Example - Sydney's 2022 Portfolio.
  • You will then need to select share and choose how you would like to share the collection with the student (you can see the options below). Personally, I really like to send by code or send the link directly to the student in Google Classroom. 

  • Now, the student can create their portfolio and you have the options to share the collection with others.
Embedded below are two videos. 
  • The first one (2:12) takes you through the steps from a teacher's point-of-view on how to get started with Classrooms in Wakelet. 
  • The second one (2:18) takes you through the steps from a student's point-of-view on how to create a collection, bookmarks, and how you as the teacher can share a collection with another student to work in a group collection.
Video #1

Video #2


Take care,
Brad

Monday, October 3, 2022

How to get started with Classrooms in Wakelet from a teacher point-of-view

 Wakelet's Classroom feature is an outstanding way for educators to share content with students in their class.

This is also an amazing and simple way for students to create a portfolio of their work. We will take a look at that in a future post.

In the tutorial you will see below I will take you through the following steps:

  • How to get a Classroom started (if you do not see the Classroom icon make sure to select settings and toggle on your Educator account).
  • Select Create Classroom (bottom left )
    • Choose either Google Classroom, Microsoft, or Clever
      • Go through the sign-in process and then add the specific class
    • Toggle on features you would like your students to have
    • Create the class
  • You can now create a collection.
    • This is great for students to have anything you can think of - review links, study guides. helpful sites, etc.
    • This collection will be instantly shared with all members in your class.
      • Please note the default sharing settings do not allow students to add anything to the collection, download as a PDF, etc. You can alter those settings as well if need be.
Embedded below is a 2 minute and 12 second YouTube tutorial.


Friday, September 30, 2022

How to see the word count in a Google Doc right away!

 If you wan to keep track of the number of words in a Google Doc you are typing, or you want to see the number in a Doc a student shared with you, simply do the following:

  • Ctrl_Shift+C
or
  • Tools > See Word Count > Toggle on Display Word Count While Typing

Embedded below is a 29 second YouTube tutorial.


Take care,
Brad

Thursday, September 29, 2022

Create a maze in seconds with mazegenerator.net! Includes solution as well!

 If you are looking for a simple site to create a maze - look no further than Mazegenerator.net

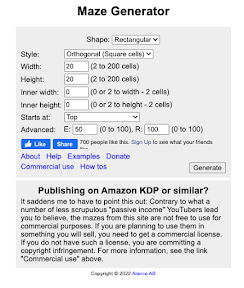
When you enter into the site you will see the options you see below. Of course you can adjust the options as you see fit. You can even change the shape of the maze as well as see a solution to the maze itself.


Embedded below is a 1 minute and 3 second YouTube tutorial.


Take care,

Brad

How to see the latest Tweets on Twitter.

 If you have been on Twitter and you noticed that the latest tweets appear to be from hours ago, make sure to select what appears to be 2 plusses and a star and then change from Top Tweets to Latest Tweets.


Embedded below is a 33 second YouTube tutorial.


Take care,
Brad


Wednesday, September 28, 2022

Google Docs The differences between using the @ in a Doc and commenting

 I have had a few teachers asking me recently about the difference between using the @ symbol in a Doc and the comment feature and what that looks like.

  • Doc in body of Doc
    • If typing in a Doc and use the @ symbol - type in someone's name and they will then be alerted and you can share the doc with them without having to go into the Share icon.
  • Comment Section
    • In the comment section you type in the @ symbol and then their email address you will see a note stating that the person you included has been added to the discussion and an email has been sent. The sharing settings will then come up for you as well.
Embedded below is a 1 minute and 51 second YouTube tutorial.


Take care,
Brad

Tuesday, September 27, 2022

Create Anything You Imagine with Little Alchemy 2!

 Little Alchemy allows you to mix items and create the world basically from scratch.  You will start with four items on the right (air, earth, fire, and water). You drag one of the items into the middle of the screen and then drag another on top of it. This will then create another item - example - water and water creates a puddle. The newly created item you can see on the right hand side as well as stored in the Encyclopedia (hint there are 720 items to create).

If you ever get stuck, or just want to see what is created you can always use YouTube to see all the creations with a full walkthrough of all 720 items. 

Embedded below is a 1 minute and 55 second YouTube tutorial I created.


Take care,

Brad

Monday, September 26, 2022

1000+ Fun & Educational Learning Activities on Turtlediary.com

 Turtlediary is an educational website that has over 1000 interactive learning activities for grades K through 5.

You can see in the images below some of what is included.


Embedded below is a 2 minute long video tutorial.


Take care,

Brad

Sunday, September 25, 2022

Hands down the easiest way to voice type on a Chromebook (dictation tool).

 A great feature in Google Docs is the ability to voice type using control shift s. Students really enjoy this feature; however, when you are not on a Google Doc - they can be a bit bummed that it does not work. 

What you can do (if you are on a Chromebook) is to go into the accessibility features and select dictation. This will have a microphone appear in the bottom righthand corner of your Chromebook. Make sure to select it and then speak. When finished speaking/typing, make sure to click on it again. While a simple tool, I am sure for many, this will be very helpful.

Embedded below is a 1 minute and 49 second YouTube tutorial.


Take care,

Brad

Saturday, September 24, 2022

Learn emoji math addition and subtraction in Google Sheets! 😀🚀

Want your students to enjoy adding and subtracting by adding different available emojis and be able to see if they got the problem correct?

If so - try Eric Curts' Google Sheets Emoji Math: Addition & Subtraction. Click here for the Google Sheets template.

Eric gives a great step-by-step tutorial and video in his post: Click here for Eric's post.

Embedded below is a 2 minute 19 second YouTube tutorial I created.


Take care,
Brad😀🚀


Friday, September 23, 2022

How to invite others to watch a private video on YouTube

 If you create a video and mark it as private, you can still share the video with others while still keeping it private.

When you publish your YouTube video you will see the options for Private, Unlisted, and Public. What is nice is, under Private you will see a link to Share Privately. 

You will then see the ability to email others to see the video. Please note that the users must have a Google account to view the video.


Take care,

Brad

Thursday, September 22, 2022

How to have your Chromebook speak selected text using the built-in Select to speak option.

 If you (or a student) would like to have selected text read aloud, simply use the Select to speak option. This option is available in the accessibility section on a Chromebook (select the area near the clock, choose accessibility and then Select to speak).

When you have a section you would like to be read aloud, make sure to choose the option, and then a text box will appear that you can drag to include the text you would like included.

Embedded below is a 2 minute and 16 second YouTube tutorial that includes the above as well as a few tips and tricks.


Take care,
Brad

Tuesday, September 20, 2022

Change the Text Style in Google Forms: Here's How!

 Google recently added the long awaited addition of adding text style in your Google Forms.

To change the font, simply choose the paint palette (Customize Theme) in the upper right and you will see the options you see below. You will see there are three sections: Header, Question, and Text. You can then adjust the text style and text size to fit your needs.


Embedded below is a 1 minute and 9 second YouTube tutorial.


Take care,

Brad