Sunday, August 11, 2024
Watching a video in Google Chrome & would like instant captions as well as the ability to translate?
Saturday, August 10, 2024
Search with Google Lens in Chrome Search with Google Lens in Chrome
Google Lens is a groundbreaking feature that enhances the way we interact with images and text on the web. In this blog post, we’ll explore how to effectively use Google Lens within Google Chrome, allowing you to search for images, translate text, and more, all at your fingertips.
Getting Started with Google Lens
To begin using Google Lens in Chrome, you'll want to familiarize yourself with its location within the browser. It's easily accessible through the customization menu. Here’s how to find it:
- Open Google Chrome.
- Click on the three vertical dots in the upper right corner to access the menu.
- Scroll down to find the option labeled Search with Google Lens.
This feature allows you to select any image you encounter while browsing, making it incredibly versatile.

Searching Images with Google Lens
Once you've located Google Lens, you can start searching for images. For instance, if you're curious about a landmark, follow these simple steps:
- Navigate to the image you want to search.
- Right-click on the image and select Search with Google Lens.
- Wait a moment as Google Lens processes the image.
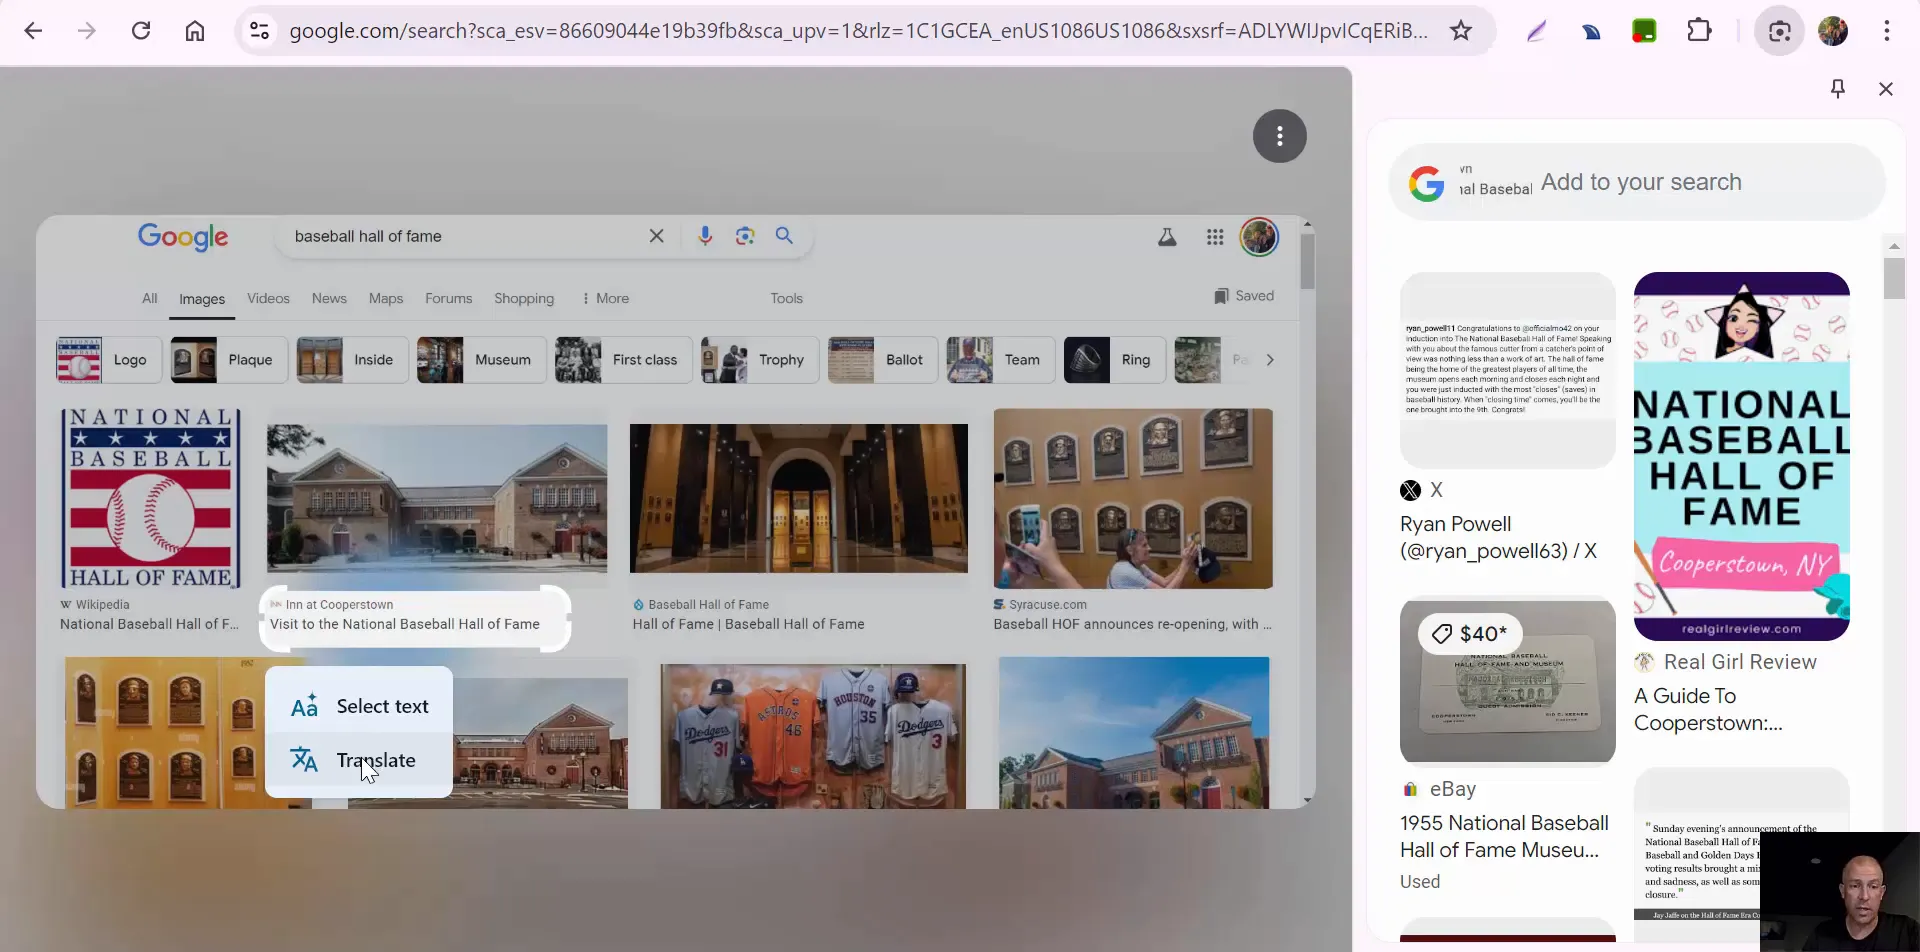
Let’s say you’re exploring the Baseball Hall of Fame. After selecting the image, Google Lens will provide visual matches and additional information. For example, it may identify the image as the National Baseball Hall of Fame.

Adding to Your Search
Google Lens goes beyond simple identification. You can enhance your search results by adding specific queries. After the initial search, you’ll see an option to Add to your search. This allows you to refine your query. For instance, you can ask, “Where is this?” and Google Lens will provide relevant details about the location.
Translating Text with Google Lens
Another fantastic feature of Google Lens is its ability to translate text. This is particularly useful when you're browsing content in a foreign language. Here’s how to translate text using Google Lens:
- Highlight the text you want to translate.
- Click on the three dots again and select Translate.
- Google Lens will use Google Translate to offer the translation instantly.
This feature is incredibly handy for travelers or anyone looking to understand foreign content quickly.

Why Use Google Lens?
Google Lens is packed with features that can transform your browsing experience:
- Visual Recognition: Instantly identify objects, landmarks, plants, and animals.
- Text Translation: Break language barriers effortlessly with real-time translations.
- Shopping Assistance: Find products online by simply taking a picture of them.
- Information Retrieval: Access detailed descriptions and articles related to images.
With just a few clicks, Google Lens can enhance your understanding of the world around you.
Conclusion
Google Lens in Chrome is a powerful tool that enriches your online experience. Whether you're searching for information, translating text, or identifying objects, its capabilities are vast and user-friendly. So the next time you browse, remember to utilize Google Lens to unlock a wealth of information right at your fingertips!
If you have any questions or need assistance, feel free to reach out. Happy browsing!
Friday, August 9, 2024
Want to have a conversation with the Declaration of Independence? Engage with Your Content: AI-Powered Document Chats with MagicSchool.ai's 'Chat with Docs
In today’s digital age, the way we interact with historical documents is evolving. MagicSchool.ai introduces an innovative tool called 'Chat with Docs' that allows both teachers and students to engage in meaningful conversations with documents. This tool is particularly transformative for subjects like history, where understanding context and nuances can be pivotal. In this blog, we’ll explore how this tool works, its benefits, and its potential impact on education.
What is 'Chat with Docs'?
'Chat with Docs' is a feature offered by MagicSchool.ai that enables users to interact with various documents in a conversational manner. This tool is designed for both teachers and students, making it versatile and accessible. By allowing users to upload documents or paste text, it opens up a new avenue for exploration and discussion.
For instance, a teacher can select a document, such as the Declaration of Independence, and instantly generate topics for discussion. This functionality not only enriches the learning experience but also encourages critical thinking and engagement with primary sources.
How Does It Work?
The process of using 'Chat with Docs' is straightforward and user-friendly. Here’s a step-by-step overview:
Select the Document: Teachers can either copy and paste text into the interface or upload a document using the provided paperclip icon.
Generate Topics: Once the document is uploaded, users can generate discussion topics based on its content. For example, with the Declaration of Independence, the tool may present several key areas to explore.
Engage in a Conversation: Users can then select a topic and ask questions or seek clarification, creating an interactive dialogue with the document.
The Power of Conversing with Historical Documents
One of the standout features of 'Chat with Docs' is its ability to foster deeper understanding through conversation. When students can engage directly with a document, they are more likely to grasp its significance and context. For example, when discussing the Declaration of Independence, students can inquire about specific grievances listed, leading to a richer understanding of the historical context.
This interactive approach encourages students to think critically and ask questions, rather than passively consuming information. It transforms the learning experience from rote memorization to active engagement, making history feel more relevant and alive.
Benefits for Teachers and Students
The 'Chat with Docs' feature offers numerous advantages for both educators and learners:
Enhanced Engagement: Students are more likely to participate in discussions when they can interact with the material in a conversational format.
Tailored Learning: The ability to ask specific questions allows students to focus on areas where they need clarification or deeper understanding.
Improved Critical Thinking: Engaging with documents in this manner encourages students to analyze and evaluate information critically.
Accessible Learning: The tool is designed to be user-friendly, making it accessible for students of various ages and skill levels.
Implementing 'Chat with Docs' in the Classroom
Integrating 'Chat with Docs' into the classroom can be a seamless process. Here are some practical tips for teachers:
Introduce the Tool: Start by demonstrating how to use 'Chat with Docs' with a familiar document. This helps students feel comfortable with the technology.
Encourage Exploration: Allow students to choose documents that interest them. This personal investment can lead to more meaningful discussions.
Facilitate Group Discussions: Use the tool as a springboard for group discussions, where students can share their insights and questions with peers.
Assess Understanding: Teachers can use the conversations generated in the tool to assess students’ understanding and engagement with the material.
Conclusion
'Chat with Docs' from MagicSchool.ai is a game changer for education, particularly in subjects like history. By allowing students to engage directly with documents like the Declaration of Independence, it fosters a deeper understanding and appreciation for historical contexts. As educators continue to seek innovative ways to engage students, tools like 'Chat with Docs' will play a crucial role in shaping the future of learning.
For more information about MagicSchool.ai and its features, consider exploring their resources or reaching out to learn more. The future of interactive learning is here, and it’s time to embrace it!
Thursday, August 8, 2024
Generate a decodable text based on the Science of Reading to support early literacy.
Decodable texts are crucial for supporting early literacy and enhancing reading skills among young learners. This blog delves into the science of reading and how decodable texts can be integrated into educational practices. By exploring the principles behind decodable texts, educators can better support their students' journey towards reading proficiency.
The Science of Reading and Decodable Texts
The science of reading is an evidence-based approach that emphasizes explicit instruction in phonics and phonemic awareness. Decodable texts are a vital component of this approach, as they are designed to reinforce the phonetic skills students are learning. These texts use controlled vocabulary that allows early readers to practice decoding words they are familiar with, thereby boosting their confidence and fluency.
What are Decodable Texts?
Decodable texts are stories or passages that contain a high proportion of words that can be sounded out phonetically. These texts are tailored to the phonetic skills that children are learning at each stage of their reading development. By utilizing decodable texts, educators can create a structured reading experience that aligns closely with the phonics instruction provided in the classroom.
The Importance of Patterns in Decodable Texts
One of the key features of decodable texts is the use of patterns. These patterns help students recognize common phonetic structures, which aids in their ability to decode new words. For example, a decodable text may focus on a specific vowel sound or consonant blend, allowing students to practice and reinforce their skills. This repetition of patterns not only aids in word recognition but also enhances overall reading comprehension.
Integrating Decodable Texts into the Curriculum
To effectively incorporate decodable texts into the curriculum, educators should consider the following strategies:
Select Appropriate Texts: Choose decodable texts that align with the phonics skills being taught in the classroom.
Model Reading Strategies: Demonstrate how to decode words and use context clues to understand the text.
Encourage Repeated Reading: Allow students to read the same text multiple times to build fluency and confidence.
Facilitate Discussions: Encourage students to discuss the text, focusing on comprehension and vocabulary.
Assessing Student Progress
Assessment is a crucial aspect of any reading program. For decodable texts, educators can assess student progress through various methods:
Reading Fluency Assessments: Monitor how quickly and accurately students can read decodable texts.
Comprehension Questions: Ask questions about the text to gauge understanding and retention.
Phonics Skills Assessments: Evaluate students' ability to decode words based on the patterns practiced in the texts.
Using Technology to Support Decodable Texts
In today’s digital age, technology can play a significant role in supporting the use of decodable texts. There are various platforms and tools available that can enhance the experience for both educators and students.
Magic School and AI Integration
One such platform is Magic School, which offers tools to generate decodable texts based on the science of reading. By selecting specific patterns and objectives, educators can create customized texts that meet the needs of their students. This level of personalization helps to ensure that students are engaging with material that is both relevant and challenging.
ChatGPT and Other AI Tools
In addition to Magic School, educators can utilize AI tools like ChatGPT to facilitate discussions around decodable texts. These tools can help generate questions or prompts that encourage deeper engagement with the material. By integrating technology, educators can enhance the learning experience and provide additional support for struggling readers.
Conclusion
Decodable texts are an essential resource in the journey toward literacy. By understanding the science of reading and effectively integrating decodable texts into the curriculum, educators can significantly impact their students' reading development. With the support of technology and a focus on phonics instruction, we can help young learners become confident and proficient readers.
For more insights and tools related to early literacy, consider exploring various educational resources and platforms that focus on decodable texts and the science of reading.
Wednesday, August 7, 2024
Ever have a YouTube video play another "related" video just seconds after the last video? Check this setting.
What is Autoplay on YouTube?
Autoplay is a feature that automatically plays another video once the current video ends. This can be particularly useful for binge-watching content or for those who enjoy a continuous stream of related videos. However, it can also lead to unexpected viewing experiences if not managed properly.
When autoplay is enabled, YouTube will suggest a related video that it believes you will enjoy based on your viewing history. This can sometimes lead to a rabbit hole of videos that may not align with your original intent. Understanding how to control this feature can enhance your viewing experience.
How to Manage Autoplay Settings
Many users may find that they accidentally enable autoplay. If you notice that videos keep playing one after another, it may be time to check your settings.
Locate the Autoplay Toggle: The autoplay feature is usually found at the top of the video player, often as a toggle switch.
Turn Off Autoplay: If you prefer to watch one video at a time, simply toggle the autoplay switch to the off position.
Check Preferences: You can also adjust your preferences in the YouTube settings menu for a more customized experience.
Benefits of Using Autoplay
Despite its potential drawbacks, autoplay can offer several advantages. Here are a few reasons why you might consider using it:
Convenience: Autoplay allows for seamless viewing without the need to manually select the next video.
Discovery: It can introduce you to new content that you may not have found otherwise.
Continuous Learning: For educational content, autoplay can help you absorb information in a more structured way.
Drawbacks of Autoplay
While autoplay has its advantages, it also comes with some downsides. Being aware of these can help you make informed viewing choices:
Loss of Control: You may find yourself watching videos that don't interest you simply because they were automatically queued.
Time Consumption: It's easy to lose track of time when videos keep playing, leading to unproductive viewing sessions.
Distraction: Autoplay can distract you from your original intent, especially if you're trying to focus on specific content.
When to Use Autoplay
Autoplay can be beneficial in certain scenarios. Here are some situations where enabling it might enhance your experience:
Binge-Watching: If you're watching a series or a playlist, keeping autoplay on can make it easier to enjoy back-to-back episodes.
Exploring New Content: When you're in the mood to discover new channels or topics, autoplay can suggest relevant videos.
Long-Duration Content: For longer videos, such as documentaries, autoplay can help maintain engagement without interruptions.
When to Turn Off Autoplay
There are also times when turning off autoplay is the better option. Consider disabling it in these situations:
Focused Learning: If you’re watching educational content and want to absorb information thoroughly, it's best to turn it off.
Specific Interests: When looking for specific topics or videos, disabling autoplay can help you stick to your plan.
Time Management: If you find yourself losing track of time, turning off autoplay can help you regain control over your viewing habits.
Conclusion
Understanding YouTube's autoplay feature can significantly enhance your viewing experience. Whether you choose to embrace it or turn it off, being aware of how it works will allow you to make the most of your time on the platform. Remember, the choice is yours—take control of your viewing habits and enjoy YouTube the way you want!
If you have any questions or need further assistance, feel free to reach out. Enjoy your viewing!
Tuesday, August 6, 2024
Create a choice board for a student assignment based on the principles of UDL using MagicSchool AI
Universal Design for Learning (UDL) is an educational framework that aims to optimize teaching and learning for all individuals by providing multiple means of engagement, representation, and action and expression. This approach eliminates barriers to learning and ensures that the educational experience is accessible to every student, regardless of their unique needs. In this blog post, we will explore how to create a choice board for student assignments using MagicSchool AI, highlighting the benefits of UDL principles and offering practical examples.
Understanding Universal Design for Learning (UDL)
UDL is grounded in the idea that every learner is unique and requires different strategies to achieve their educational goals. This flexibility allows teachers to accommodate various learning styles, preferences, and needs. By incorporating UDL principles into lesson planning, educators can create a more inclusive classroom environment.
One of the key aspects of UDL is the elimination of barriers to learning. This can include providing resources in multiple formats, offering choices in how students demonstrate their understanding, and ensuring that all students have access to the materials they need to succeed.
MagicSchool AI: A Tool for UDL Implementation
MagicSchool AI is an innovative tool that helps educators design engaging learning experiences tailored to their students' needs. By using this platform, teachers can easily generate diverse activities that align with specific learning goals, making it an ideal resource for implementing UDL principles in the classroom.
To get started with MagicSchool AI, educators simply input their learning goal and any additional details. The platform then generates a variety of activity options that cater to different learning preferences. For example, a teacher might input a seventh-grade learning goal focused on mitosis, requesting a range of diverse activities.
Creating a Choice Board with MagicSchool AI
A choice board is an excellent way to provide students with options for how they engage with a topic. By allowing students to choose from a variety of activities, teachers can foster a sense of ownership over their learning and encourage creativity.
When using MagicSchool AI to create a choice board, educators can expect to receive a list of activities that might include:
Flip book
Poster explanation
Comic strip
3D model creation
Quiz
Rap or song
Presentation
Application of mitosis in everyday life
This variety ensures that students can select activities that resonate with their interests and strengths. For instance, a student who enjoys art might opt to create a poster using design software like Canva, while another student might prefer to express their understanding through a rap or song.
Engaging Students Through Choice
Providing students with choices in how they learn and demonstrate their understanding can significantly increase engagement. When students are allowed to pursue projects that align with their interests, they are more likely to be motivated and invested in their learning.
For instance, a student interested in music might choose to write and perform a rap about mitosis. With the help of MagicSchool AI's song generator feature available in Magic Student, they can quickly create lyrics that incorporate key concepts and terminology related to the topic. This not only enhances their understanding but also allows them to share their learning with peers in a creative way.
Additional Features of MagicSchool AI
MagicSchool AI offers a range of features that make it a valuable tool for educators. Beyond generating activity ideas, it provides resources for tracking student progress and facilitating collaboration. Teachers can monitor the activities students choose and provide feedback along the way.
Additionally, MagicSchool AI encourages the integration of technology in the classroom. By incorporating digital tools into assignments, educators can help students develop essential skills for the modern world while also catering to diverse learning preferences.
Conclusion
Incorporating Universal Design for Learning principles into lesson planning is essential for creating an inclusive educational environment. MagicSchool AI simplifies this process by allowing educators to generate diverse activity options tailored to specific learning goals. By using a choice board, teachers can empower students to take control of their learning and engage with content in meaningful ways.
As we continue to embrace the principles of UDL, tools like MagicSchool AI will play a crucial role in shaping the future of education. By eliminating barriers and fostering creativity, we can ensure that every student has the opportunity to succeed.
If you have any questions or need assistance with implementing UDL in your classroom, feel free to reach out. Happy teaching!
Monday, August 5, 2024
While watching a YouTube video - you can move where the captions are located!
YouTube has become an essential platform for learning, entertainment, and sharing ideas. One of its great features is the ability to enable closed captions or subtitles, making content accessible to a broader audience. However, the default position of captions may not always be ideal for everyone. This blog will explore how you can easily move the captions around while watching a YouTube video, enhancing your viewing experience.
Understanding Closed Captions
Closed captions are designed to provide a text version of the spoken content in videos. They are especially beneficial for viewers who are deaf or hard of hearing, as well as those who prefer to watch videos in a noisy environment. Captions can also help non-native speakers of a language understand the content better.
While closed captions are incredibly useful, their placement can sometimes obstruct important visuals in the video. This is where the customization feature comes into play, allowing users to reposition captions according to their preferences.
How to Enable Captions on YouTube
Before you can move captions around, you need to enable them. Here’s how:
Step 1: Open a YouTube video.
Step 2: Look for the "CC" icon located at the bottom right of the video player.
Step 3: Click the "CC" icon to enable closed captions.
Once captions are enabled, they will appear at the bottom of the video screen by default. However, you can easily change their position.
Moving Captions While Watching
YouTube allows viewers to reposition captions to enhance their viewing experience. Here’s how to move captions:
Step 1: Begin playing the video with captions enabled.
Step 2: Click and drag the captions to your desired position on the screen.
Step 3: Release the mouse button to set the captions in their new location.
This feature is particularly useful in full-screen mode. Whether you prefer captions at the top or bottom of the screen, you have the freedom to place them wherever they are least obstructive to your viewing experience.
Benefits of Customizing Caption Placement
Customizing caption placement enhances the overall viewing experience in several ways:
Improved visibility: Placing captions away from important visuals ensures that you don’t miss any critical content.
Personal preference: Everyone has different preferences for caption placement. Customization allows you to choose what works best for you.
Accessibility: Making captions more accessible can help viewers focus better on the content.
Conclusion
Moving captions around while watching a YouTube video is a simple yet powerful feature that enhances your viewing experience. By enabling closed captions and adjusting their position, you can enjoy a more comfortable and engaging experience, whether you are watching tutorials, entertainment, or educational content.
If you have any questions or need further assistance regarding caption customization, feel free to reach out. Happy viewing!
Sunday, August 4, 2024
GearSketch! Draw circles and gears will appear. You can then have them interact or have them on their own. Great for engineering or science class!
Saturday, August 3, 2024
Printed a two-sided Google Sheet/Doc and the 2nd page is upside down? Here is one solution.
Printing documents from Google Sheets and Docs is usually a straightforward process. However, users may encounter unexpected issues, such as the second page printing upside down. This can be frustrating, especially when you need to present documents professionally. In this blog, we will explore the common problem of upside-down printing and provide a simple solution to fix it.
Understanding the Problem
When printing a document that spans multiple pages, the orientation of the pages is crucial for readability. If the second page prints upside down, it can disrupt the flow and make the document challenging to read. This issue often arises from incorrect print settings, which can be easily adjusted.
Users frequently report this problem when printing double-sided documents. It may seem minor, but it can significantly impact how the document is perceived, especially in a professional setting. Understanding how to control the print settings can save time and prevent potential embarrassment.
Common Causes of Upside Down Printing
Several factors can contribute to the issue of upside-down printing:
Printer Settings: Incorrect configuration in the printer settings can lead to improper page orientation.
Print Layout: The layout chosen for printing, such as double-sided printing, can affect how pages are printed.
Document Formatting: If the document is not formatted correctly, it may result in unexpected printing behavior.
Identifying the cause is the first step towards resolving the issue. Knowing where to look can save you from unnecessary troubleshooting and frustration.
Steps to Fix Upside Down Printing
If you find yourself facing the issue of upside-down printing, follow these steps to resolve it:
1. Access the Print Settings
Before printing your document, you need to access the print settings. This is typically done by clicking on the "File" menu and selecting "Print" or using the shortcut Ctrl + P (Cmd + P on Mac).
2. Check the Print Options
Once you are in the print settings, look for the option that controls how the document is printed. You should see options related to double-sided printing and page orientation.
3. Change the Print Orientation
If you are printing double-sided, find the setting that says "Print on both sides." Change this option to "Flip on short edge." This adjustment will ensure that the second page prints correctly, aligning it with the first page.
4. Preview Your Document
Before finalizing the print job, use the print preview feature to see how your document will appear once printed. This step can help you catch any further issues before wasting paper.
5. Print Your Document
After making the necessary adjustments, go ahead and print your document. With the correct settings in place, the second page should print in the proper orientation.
Additional Tips for Successful Printing
Here are some additional tips to ensure smooth printing of your Google Sheets and Docs:
Always Preview: Make it a habit to preview your documents before printing. This can help you spot issues early.
Check Printer Compatibility: Ensure that your printer is compatible with double-sided printing. Some older models may not support this feature.
Update Printer Drivers: Keeping your printer drivers updated can improve printing performance and resolve bugs.
Use Quality Paper: Using good quality paper can prevent jams and improve print quality.
Conclusion
Dealing with upside-down printing in Google Sheets and Docs can be an annoying experience, but it is a problem that can be easily fixed. By adjusting your print settings to "Flip on short edge," you can ensure that your documents are printed correctly and professionally.
Understanding the common causes and following the outlined steps can help you navigate this issue with ease. If you encounter any further questions or challenges, don’t hesitate to reach out for assistance. Happy printing!
Friday, August 2, 2024
Closed a Tab by mistake? Here are a few ways to get that page back.
How to Recover a Closed Tab: Simple Solutions
Thursday, August 1, 2024
Duplicate Your Google Form Today: It's Easier Than You Think
Wednesday, July 31, 2024
Chat with Gemini from the address bar Type “@” in the address bar and select Chat with Gemini. Write your prompt. Get your response on gemini.google.com.
Introduction to AI Accessibility
As technology continues to evolve, the integration of artificial intelligence into our daily lives becomes increasingly seamless. One of the most exciting developments is the ability to access AI tools directly from your web browser's address bar. This guide will walk you through how to utilize Gemini, an AI tool, right from your browser, making it easier to get the information you need at your fingertips.
What is Gemini?
Gemini is an advanced artificial intelligence tool designed to assist users in retrieving information quickly and efficiently. It can answer questions, provide insights, and help with various tasks, making it a versatile resource. With Gemini, you can access a wealth of data without navigating through multiple websites or applications.
How to Access Gemini from Your Address Bar
Accessing Gemini is a straightforward process. Follow these simple steps to harness the power of AI directly from your browser's address bar.
Step-by-Step Instructions
Open Your Web Browser: Start by launching your preferred web browser.
Navigate to the Address Bar: Click on the address bar at the top of your browser.
Type in the Command: Enter @Gemini in the address bar.
Hit the Space Bar: After typing the command, press the space bar to initiate the search.
Ask Your Question: Type in your query, such as “Did the Phillies win last night?”
Submit Your Query: Press the Enter key to receive your answer.
Benefits of Using Gemini
The ability to access Gemini from the address bar offers numerous advantages. Here are some key benefits:
Quick Access: Get immediate answers without navigating to separate websites.
User-Friendly: The interface is straightforward, making it accessible for everyone.
Time-Saving: Reduce the time spent searching for information online.
Versatile Queries: Ask a wide range of questions, from sports scores to general knowledge.
Enhanced Productivity: Streamline your workflow by integrating AI into your daily tasks.
Common Questions About Gemini
As with any new tool, users may have questions about how to maximize its potential. Here are some frequently asked questions regarding Gemini.
What types of questions can I ask Gemini?
You can ask Gemini a variety of questions, including:
Sports scores and updates
Weather forecasts
General trivia and facts
Definitions and explanations
News headlines and summaries
Is there a limit to the number of queries I can submit?
No, you can use Gemini as often as you like. There are no restrictions on the number of queries, allowing for continuous access to information.
Can Gemini provide real-time information?
Yes, Gemini is designed to pull in real-time information, making it an excellent resource for up-to-date news and sports scores.
Troubleshooting Common Issues
While using Gemini is typically smooth, you may encounter some common issues. Here’s how to troubleshoot them:
Problem: Gemini Doesn't Respond
If you find that Gemini isn't responding, try the following:
Ensure you typed @Gemini correctly in the address bar.
Check your internet connection.
Refresh the page or restart your browser.
Problem: Inaccurate Answers
If Gemini provides an answer that seems incorrect, consider rephrasing your question. Clarity can significantly impact the accuracy of the response.
Problem: Slow Response Time
Slow responses can occur due to high traffic. If this happens, wait a moment and try again.
Future of AI in Everyday Life
The integration of AI tools like Gemini into our daily routines signifies a shift toward more efficient information retrieval methods. As technology continues to advance, we can expect even more innovations that enhance our interaction with AI. The future is bright for AI accessibility, promising a world where information is always at our fingertips.
Conclusion
Accessing Gemini from your address bar is a game-changer for anyone looking to enhance their information-gathering process. With just a few simple steps, you can unlock the potential of AI right from your browser. Whether you're checking sports scores or seeking general knowledge, Gemini provides quick, efficient answers.
Don't hesitate to explore this powerful tool. If you have any questions or need assistance, feel free to reach out. Embrace the future of technology and make AI a part of your everyday life!
Tuesday, July 30, 2024
Take any image and transform it into Lego form in seconds using AI
In today's digital age, the intersection of technology and creativity has birthed exciting tools that allow us to reimagine our favorite images in innovative ways. One such tool is the ability to transform ordinary photos into Lego characters using artificial intelligence. This blog will explore the process of converting images into Lego forms effortlessly, offering insights and tips to make the most out of this fun activity.
Understanding the Basics of AI Image Transformation
Artificial intelligence has revolutionized many aspects of our lives, including how we interact with images. AI image transformation tools leverage machine learning algorithms to analyze and reinterpret images. These tools can take a simple photograph and apply various styles or themes to create something unique.
When it comes to transforming images into Lego characters, the AI recognizes key features and elements in the original photo. It then reconstructs these elements in a pixelated, blocky style reminiscent of Lego figures. This process is not only entertaining but also allows for a new way to engage with our memories captured in photographs.
Getting Started: The Tools You Need
To begin your journey into Lego character transformation, you'll need a few essential tools. Here’s a quick list:
Image: Choose a clear and well-lit photo that you want to transform.
AI Tool: Access to an AI image transformation tool, such as ChatGPT-4.
Device: A computer or smartphone with internet access.
Once you have these tools ready, you're set to start the transformation process.
Step-by-Step Guide to Transforming Your Image
Transforming an image into Lego characters is straightforward. Follow these steps to create your own Lego version of a photo:
1. Select Your Image
Start by selecting a photo that you’d like to transform. For example, you might choose a family picture, a favorite vacation snapshot, or even a pet. The clearer and more distinct the image, the better the AI will perform.
2. Upload the Image
Once you have your image ready, navigate to the AI tool you are using. In the case of ChatGPT-4, you will find an option to upload images. Select the image file from your device and upload it to the platform.
3. Initiate the Transformation
After uploading the image, look for the transformation option. Depending on the tool, you may have to click a button or select a setting to start the conversion process. Be patient, as it may take up to 45 seconds for the AI to process your request.
4. Review the Result
Once the transformation is complete, you will see the Lego version of your original image. Take a moment to review it. Sometimes, the transformation may not work perfectly on the first try. If that happens, don’t hesitate to try again with a different image or settings.
5. Download and Share
If you’re happy with the transformed image, you can download it to your device. This image can be shared with friends and family, used as a fun profile picture, or even printed for display.
Exploring Other Transformations
The fun doesn’t have to stop at Lego characters. Many AI tools allow for various transformations beyond just Lego figures. Here are some other styles you can explore:
The Simpsons: Transform your image into characters reminiscent of the beloved animated series.
Cartoon Styles: Experiment with different cartoon styles to see how your image adapts.
Pixel Art: Create a retro pixel art version of your photo.
Each of these transformations brings a new twist to your images, allowing you to express creativity and nostalgia in different ways.
Tips for Optimal Results
To achieve the best results from your image transformations, consider the following tips:
Choose High-Quality Images: The better the quality of your image, the more accurate the transformation will be.
Experiment: Don’t be afraid to try different images and styles. The more you experiment, the more fun you’ll have.
Use Clear Subjects: Images with clear subjects tend to yield better results than busy or cluttered backgrounds.
Conclusion
Transforming images into Lego characters using AI is an enjoyable and creative process that anyone can partake in. With just a few simple steps, you can reimagine your favorite photos and share them with others in a playful way. Whether you're looking to create a unique gift or simply want to explore the capabilities of AI, this activity is sure to provide hours of fun.
So gather your images, fire up your AI tool, and start creating. The possibilities are endless, and who knows? You might just find your next favorite piece of art in the process!
Monday, July 29, 2024
Set Students Up for Success (Tier 2/3, MTSS, IEPS, etc. Creating SMART Goals Trackers with MagicSchool.ai
Setting students up for success is paramount in education, especially for those requiring additional support. In today's educational landscape, tools like SMART goals trackers play a crucial role in helping educators tailor their approaches to meet individual student needs. This article will delve into the importance of SMART goals, how to utilize them effectively, and the benefits they offer in various educational settings, including Tier 2 and 3 interventions, Multi-Tiered System of Supports (MTSS), and Individualized Education Programs (IEPs).
Understanding SMART Goals
SMART goals are a framework that helps educators and students set clear, achievable objectives. The acronym SMART stands for Specific, Measurable, Achievable, Relevant, and Time-bound. Each component plays a vital role in ensuring that goals are not only set but also attained effectively.
Specific: Goals should be clear and specific, answering the questions of who, what, where, when, and why.
Measurable: It should be easy to measure progress, allowing for adjustments to be made as necessary.
Achievable: Goals should be realistic and attainable to foster motivation.
Relevant: The goals should align with broader educational objectives and the individual needs of the student.
Time-bound: Setting a deadline for goal completion encourages focus and urgency.
Importance of SMART Goals in Education
Implementing SMART goals in educational settings is essential for several reasons. They provide a structured approach to goal-setting that can lead to improved student outcomes. Here are some key benefits:
Clarity: Students understand what is expected of them.
Focus: Educators can concentrate on specific areas for improvement.
Accountability: Both students and educators can track progress and make necessary adjustments.
Motivation: Achieving smaller milestones boosts student confidence and motivation.
Utilizing SMART Goals Trackers
SMART goals trackers are tools that help educators create, monitor, and adjust goals for students. These trackers can be customized to fit the needs of various educational levels, from preschool to university. Here’s how to effectively utilize them:
Creating the Tracker
When creating a SMART goals tracker, educators can begin by identifying the student’s specific needs. This might include academic goals, behavioral goals, or social-emotional development. The tracker can then be designed to include:
Student name and grade level
Specific goals aligned with the student’s needs
Frequency of goal review (weekly, bi-weekly, etc.)
Methods for tracking accommodations and behaviors
Example of a SMART Goals Tracker
Let’s consider an example for a ninth-grade student. The goals might include:
Self-regulation when upset
Positive social interactions
Homework completion
Classwork completion
These goals can then be broken down further to specify how often the student will practice these skills and what criteria will be used to measure success.
Adjusting Goals as Needed
One of the strengths of SMART goals is their flexibility. Educators can easily edit goals based on the student’s progress or changing needs. This adaptability is particularly important in Tier 2 and Tier 3 interventions, where students may require more intensive support.
Monitoring Progress
Regularly monitoring progress is crucial for ensuring that students are on track to meet their goals. This can involve:
Conducting weekly check-ins to assess progress
Gathering feedback from the student regarding their self-assessment
Adjusting strategies and supports as necessary based on data collected
Celebrating Achievements
As students meet their SMART goals, celebrating these achievements is vital. Recognizing progress reinforces positive behavior and motivates students to strive for further success.
Integrating SMART Goals into MTSS and IEPs
SMART goals are particularly beneficial within the frameworks of MTSS and IEPs. These systems are designed to provide additional support to students who may be struggling academically or behaviorally.
Multi-Tiered System of Supports (MTSS)
MTSS is a comprehensive framework that integrates academic and behavioral support. SMART goals fit seamlessly into this model by providing clear objectives at each tier of support:
Tier 1: Universal interventions for all students.
Tier 2: Targeted interventions for students needing additional support.
Tier 3: Intensive interventions for students with significant challenges.
By setting SMART goals at each tier, educators can ensure that all students receive the appropriate level of support tailored to their needs.
Individualized Education Programs (IEPs)
For students with IEPs, SMART goals are essential in outlining specific educational objectives. These goals should be aligned with the student’s unique needs and should involve input from educators, parents, and the students themselves.
Goals should address academic skills, behavioral improvements, and social skills.
Progress should be regularly reviewed and documented.
Adjustments should be made in collaboration with the IEP team to ensure the student is supported effectively.
Conclusion
Creating and utilizing SMART goals trackers is a powerful strategy for fostering student success in various educational contexts. By focusing on specific, measurable, achievable, relevant, and time-bound objectives, educators can provide the necessary support for students to thrive. Whether in a Tier 2 or Tier 3 intervention, or within the framework of an IEP, SMART goals ensure that every student has the opportunity to reach their full potential. As we strive to meet the diverse needs of our learners, let’s embrace the power of SMART goals and trackers to guide our efforts and celebrate our students’ successes.
Sunday, July 28, 2024
Elevate Your PD: Crafting Professional Development Plans with MagicSchool.ai's PD Planner
Professional development (PD) is crucial for educators to enhance their skills and effectiveness in the classroom. However, creating a comprehensive PD plan can often be a daunting task. Fortunately, with the advent of technology, tools like MagicSchool AI offer innovative solutions to streamline this process. This article explores how to effectively use MagicSchool's PD Planner to craft tailored professional development plans that meet the needs of your school staff.
Understanding the Importance of Professional Development
Professional development is not just a requirement; it is an opportunity for educators to grow. It allows teachers to refine their skills, stay updated on educational trends, and ultimately improve student outcomes. A well-structured PD plan can:
Enhance teaching strategies
Promote collaboration among staff
Encourage the adoption of new technologies
Support personal and professional growth
However, effective PD requires careful planning and consideration of the audience's needs. This is where tools like MagicSchool AI come into play.
Introducing MagicSchool AI's PD Planner
MagicSchool AI's PD Planner is designed to simplify the creation of professional development plans. It allows educators to easily describe their audience, set timeframes, and generate detailed plans in just a few clicks. The user-friendly interface ensures that even those with minimal tech skills can navigate the tool effectively.
Step-by-Step Guide to Using MagicSchool AI
Creating a PD plan with MagicSchool AI is straightforward. Here’s a step-by-step guide:
Identify Your Audience: Start by defining the audience for your PD plan. For instance, you might choose “K to 4 Elementary” teachers.
Set the Duration: Determine how long the PD session will last. A 30-minute session is a typical choice.
Input the Topic: Enter the focus of the PD session. For example, you may want to emphasize “using MagicSchool AI.”
Generate the Plan: Click on the generate button and watch as the tool compiles a comprehensive PD plan tailored to your specifications.
This process takes only seconds and provides a clear structure for your PD session.
Analyzing the Generated PD Plan
Once you have generated the plan, it is essential to analyze the content provided. MagicSchool AI outlines the structure of the session, including:
Introduction: Set the stage for the PD session.
Main Activities: Detailed activities that engage participants.
Conclusion: Summarize the key takeaways and next steps.
Each section is timed, ensuring that you stay on track and cover all necessary material within the allotted time. This level of detail is particularly beneficial for educators who may struggle with time management in PD settings.
Customizing Your PD Plan
While MagicSchool AI provides a solid foundation, customization is key to addressing the unique needs of your staff. Consider the following:
Adjust Content: Modify activities and topics to better suit your audience's interests and existing knowledge.
Incorporate Feedback: Use feedback from previous PD sessions to enhance the current plan.
Add Resources: Include additional resources, such as articles or videos, to enrich the learning experience.
Customization ensures that the PD session is relevant, engaging, and valuable for all participants.
Leveraging AI for Enhanced Interaction
One of the standout features of MagicSchool AI is its ability to integrate with other AI tools, such as ChatGPT. This integration allows for deeper engagement with the material and provides opportunities for participants to ask questions and seek clarification in real-time.
Utilizing ChatGPT for Follow-Up Questions
After generating your PD plan, consider using ChatGPT for further exploration of the topics covered. Here’s how:
Copy the PD Plan: Once you have your plan, copy it into ChatGPT.
Ask Questions: Engage with the AI by asking questions related to the content. This can foster a richer discussion during the PD session.
Seek Additional Resources: Request recommendations for articles, videos, or tools that align with your PD topics.
This approach not only enhances the learning experience but also encourages a culture of inquiry among educators.
Conclusion: Empowering Educators with MagicSchool AI
MagicSchool AI's PD Planner is a game-changer for developing professional development plans. Its ease of use and ability to generate comprehensive, time-sensitive plans makes it an invaluable resource for educators. By leveraging this tool, you can create engaging and effective PD sessions that cater to the specific needs of your staff.
As education continues to evolve, embracing technology in professional development is essential. With tools like MagicSchool AI, educators can focus on what truly matters: enhancing their skills and improving student outcomes. Remember, a well-crafted PD plan is not just a checklist; it is an opportunity for growth and collaboration within your educational community.
Saturday, July 27, 2024
Have students ace their Studies: Master Any Subject with MagicSchool.ai's 'Quiz Me' Feature
In today’s fast-paced educational environment, students are constantly seeking efficient tools to enhance their learning experience. One innovative solution that stands out is the 'Quiz Me' feature from MagicSchool AI. This tool empowers students to quiz themselves on a wide range of subjects, ensuring they can master any topic effectively. In this blog, we will explore the functionalities of 'Quiz Me', its benefits, and how it can transform the way students study.
Understanding the 'Quiz Me' Feature
The 'Quiz Me' feature is designed to provide students with a personalized learning experience. It allows users to select a grade level and a specific subject or topic to create quizzes tailored to their needs. For instance, a third grader can easily choose a topic like motorcycles, and the system will generate relevant questions.
This flexibility in topic selection is one of the key advantages of 'Quiz Me'. Students are not limited to predefined questions; instead, they can explore subjects that interest them or areas where they need improvement. This feature encourages active learning and engagement, as students are more likely to retain information when they are invested in the content.
How 'Quiz Me' Works
Using the 'Quiz Me' feature is straightforward and user-friendly. Students begin by selecting their grade level and the topic they wish to study. Once the parameters are set, the system generates a series of questions related to that topic. The questions typically come in multiple-choice format, making it easy for students to answer.
For example, if a student chooses the topic of evaporation, the system might pose questions about the process where water turns from a liquid to a gas. This not only tests the student’s knowledge but also reinforces their understanding of scientific concepts.
Interactive Learning Experience
One of the standout features of 'Quiz Me' is its interactive approach to learning. When a student answers a question, whether correctly or incorrectly, the system provides immediate feedback. This instant response is crucial for effective learning, as it helps students understand their mistakes and learn from them.
For instance, if a student selects an incorrect answer, the system will explain why that answer is wrong. This detailed feedback loop ensures that students grasp the underlying concepts rather than just memorizing answers. Such an interactive learning experience fosters deeper understanding and retention of material.
Benefits of Using 'Quiz Me'
The 'Quiz Me' feature offers numerous benefits that can significantly enhance a student's study habits and academic performance. Here are some of the key advantages:
Customizable Learning: Students can tailor their quizzes to focus on specific subjects, enabling them to concentrate on areas that require improvement.
Immediate Feedback: The instant feedback provided after each question helps students identify their strengths and weaknesses in real time.
Engagement: By allowing students to choose topics that interest them, 'Quiz Me' keeps them engaged and motivated to learn.
Self-Paced Learning: Students can work at their own pace, revisiting questions and topics as needed without the pressure of a traditional classroom setting.
Preparation for Tests: Regular quizzing can help students prepare for upcoming tests and exams by reinforcing their knowledge and boosting their confidence.
Enhancing Study Techniques
Incorporating 'Quiz Me' into study routines can significantly enhance traditional study techniques. Here’s how students can make the most of this feature:
Set Goals: Before starting a quiz, students should set specific learning goals to focus their efforts and track their progress.
Review Incorrect Answers: After completing a quiz, students should review the questions they answered incorrectly to understand their mistakes better.
Regular Practice: Consistent practice using the 'Quiz Me' feature can help reinforce learning and improve retention over time.
Mix Subjects: Students can benefit from mixing different subjects in their quizzes to create a more comprehensive study session.
Use as a Group Activity: Students can collaborate with peers by quizzing each other, making studying a more social and enjoyable experience.
Conclusion
The 'Quiz Me' feature from MagicSchool AI is a powerful tool that can revolutionize the way students approach their studies. Its customizable quizzes, immediate feedback, and engaging format make it an invaluable resource for learners of all ages. By integrating this innovative tool into their study routines, students can enhance their understanding of various subjects, boost their confidence, and ultimately achieve academic success.
As education continues to evolve, embracing technology like 'Quiz Me' can provide students with the support they need to excel. If you have any questions or need further information about using the 'Quiz Me' feature, don’t hesitate to reach out. Happy studying!
Friday, July 26, 2024
Stand Out Online: Generate Impactful Social Media Posts with MagicSchool.ai
Thursday, July 25, 2024
Twist Your Tongue: Craft Fun and Challenging Tongue Twisters with MagicSchool.ai
-
How to Respond to Texts with Emoji Reactions in iOS 18 With the release of iOS 18, Apple has introduced several ne...
-
Ever have a video playing on your mobile device and still want to scroll though your feed? Look in the upper right of your screen and select...